%20(500%20x%20162%20px)(1).png)
Examination Answers
Certificate Lifecycle
Test 1 - You have now downloaded a PEM certificate and a private key. Your goal is to issue a new certificate for the same end entity as a JKS keystore.
ANSWER:
Modify the End Entity profile called “ExamProfile” profile and ADD the JKS keystore to the Available Tokens section (leave PEM as an available option).
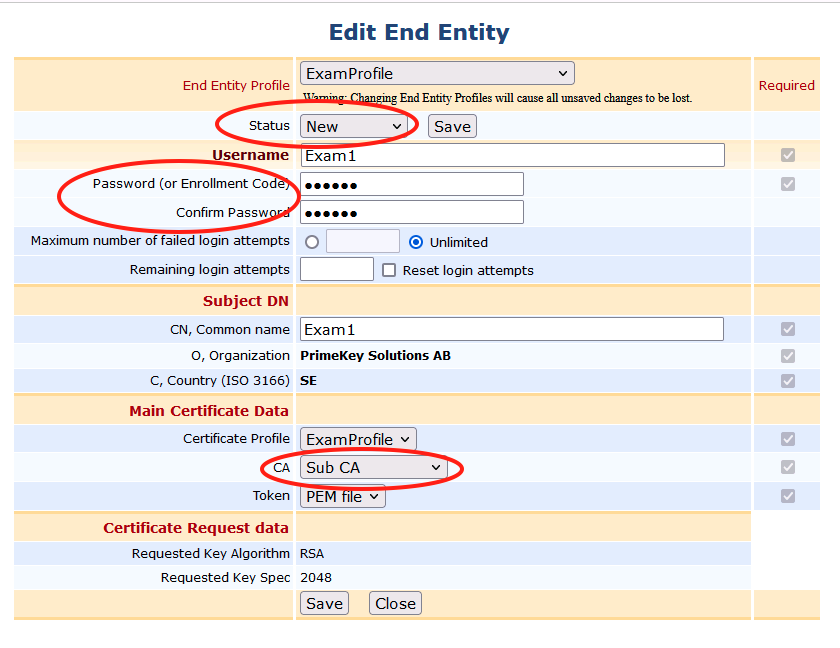
Before issuing another certificate to an existing user, the user’s entry must be put back into NEW status. When a certificate is created for a user, EJBCA will flip the status from NEW to GENERATED. In our case, this entry already has a certificate, so change the status from GENERATED to NEW.
Put the user entry Exam1 back into NEW status, by modifying the End Entity. Search for the entry using AdminWeb RA Functions >> Search End Entities
Select the entry and click EDIT End Entity
Use the drop-down list box, and select NEW (change from GENERATED)
Enter a passcode, and confirm the passcode
Click Save
Issue the certificate using RA Web
Open RA web, select Enroll >> Use Username, (this option is used because the entry already exists in the database) enter Exam1 for the Username – enter the enrollment code, and click Check - select the Download JKS.
NOTE: Difference between “Make New Request” and Use “UserName” in RA Web.
Make new request - CREATES the user and CERTIFICATE at the same time. Use this option when a user does NOT exist in the PKI database.
Use Username - the user has already been CREATED and exists in the database this option will only create a certificate.
Test 2 - You now have downloaded a JKS keystore. Your goal is to create a new keystore signed by the SubCA for the same end entity, perform this exercise.
ANSWER:
Update the “ExamProfile” Certificate profile, and add SubCA as an AVAILABLE CA
Next, update the End Entity profile called “ExamProfile” with the SubCA as the default CA, and as an Available CA
Next put the user entry Exam1 back into NEW status, by modifying the End Entity Exam1
Search for the entry Exam1 using AdminWeb and
Edit the Exam1 end entity by changing the status to NEW
Enter an enrollment code and confirm the enrollment code
Select Sub CA as the issuing CA and click Save
Issue the certificate using RA Web
Open RA web, select Enroll >> Use Username, (this option is used because the entry already exists in the database)
Enter Exam1 for the Username
Enter the enrollment code &
Click check
Select the Download JKS
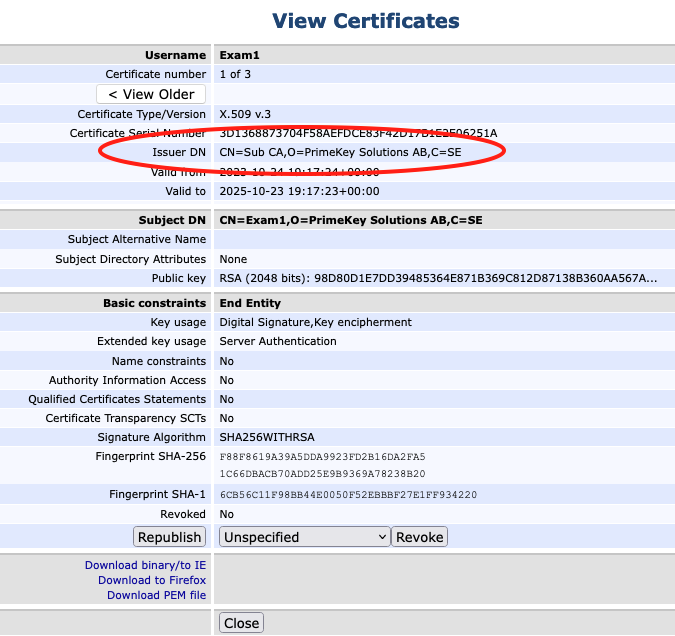
If you view the entry in AdminWeb, you will see the user now has 3 certificates. Use the View older & View newer buttons to page through the certificates.
Test 3 - You now have downloaded a keystore with a certificate inside that has an extended key usage value of Server Authentication, create a new certificate with Client Authentication.
ANSWER:
Modify the “ExamProfile” certificate profile, by removing server authentication, and adding client authentication, and SAVE the certificate profile
OR
ADD the extended key usage of Client Authentication to the certificate profile and keep Server Authentication as well.Next put the user entry Exam1 back into NEW status, by modifying the End Entity Exam1.
Enter an enrollment code and confirm the enrollment code
Open RA web, select Enroll >> Use Username, (this option is used because the entry already exists in the database) enter Exam1 for the Username – enter the enrollment code, and click Check - select the Download JKS.
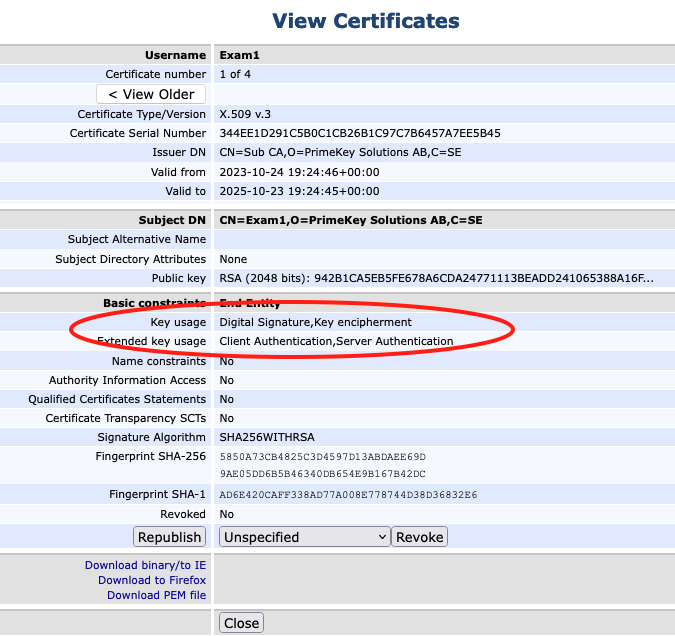
If you view the entry in AdminWeb, you will see the user now has 4 certificates. The fourth certificate has key usage of Server and Client Auth as shown here:
Key Bindings and Peer Connectors
Test 1 - A peer connector is now setup and OCSP signing keys have been created for the Sub CA. The goal is to create OCSP signing keys for the Root CA and configure an OCSP signer on the VA to respond for the Root CA.
ANSWER:
The steps are outlined below, and are very similar to the steps used to create the SubCA OCSP Signing key. The difference this time, is our crypto token exists, and we will be adding the RootCA signing keys to it. If you need a refresher, see the steps outlined in section "OCSP Configuration V8".
Follow the steps below to create the ROOT CA Signing keys, and add them to the existing crypto token labeled OCSP. You will be performing steps on both the CA and VA instances, pay close attention to the instructions, and which EJBCA instance you are performing the steps on.
Modify OCSP Crypto Token
Open a browser and access the Admin Web Portal on your VA
Select CA Functions >> Crypto Tokens in the left-side menu
Select the existing "OCSP" crypto token by clicking on OCSP
Enter RootCAOcspKey00001 as the name for the new key, choose RSA 2048 from the list, and click Generate new key pair
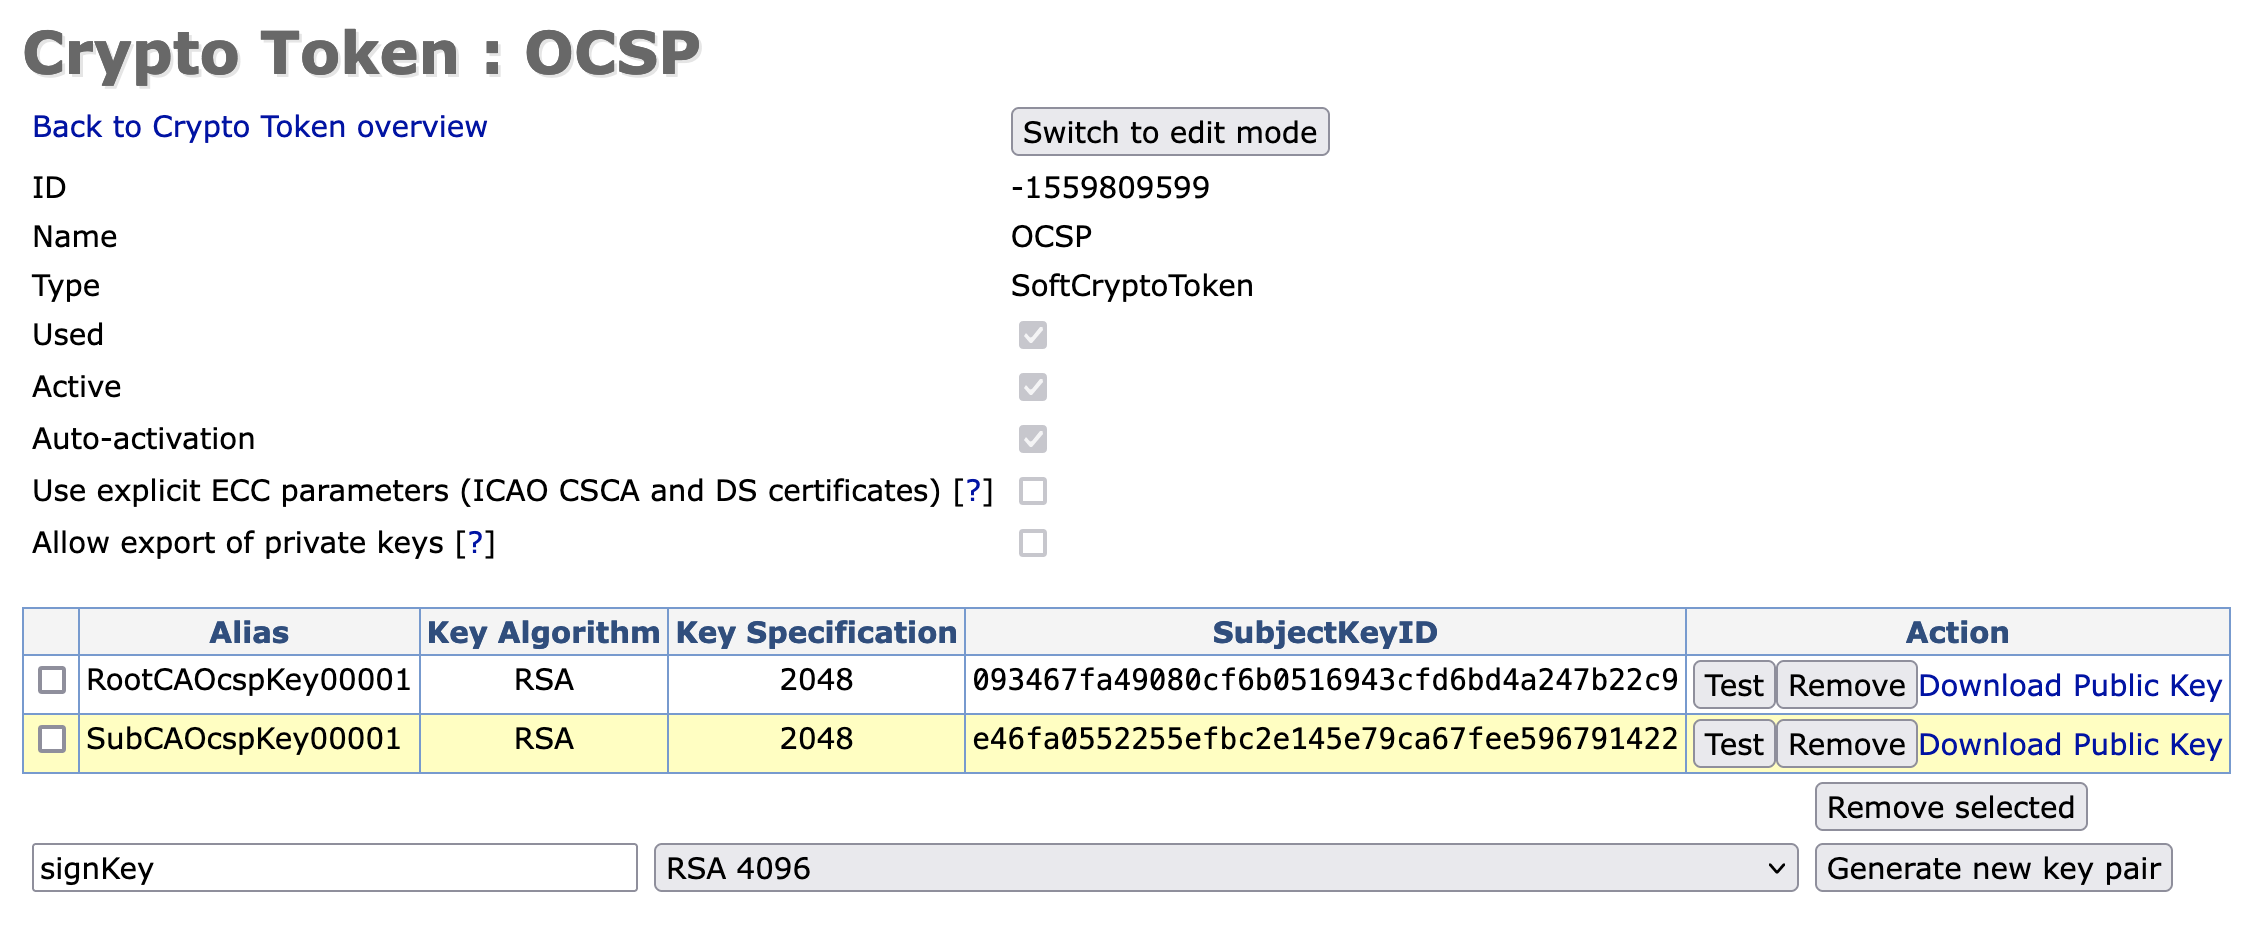
You will now have two signing keys listed, one for the SubCA, and one for the RootCA. Each will sign requests for their respective CA.
Create OCSP Key Binding - generate the CSR for RootCA
Open a browser and access the Admin Web Portal on your VA
Click VA Functions >> OCSP Responders
Click Create new
In the Name field, enter RootCA
In the Crypto Token list, select OCSP
In the Key Pair Alias list, select RootCAOcspKey00001
In the Signature Algorithm list, select SHA256WithRSA
Click Create
Click Back to Overview
In the RootCA row under the Actions column click CSR
Download the RootCA.pkcs10.pem CSR
Next, use the OCSP Signing Certificate profile, and the OCSP End Entity profile, to create the RootCA signing certificate. These profiles were created earlier, when the SubCA signing certificate was created.
Issue the RootCA OCSP Signing Certificate
Open a browser and access the RA Web Portal on your CA
Click Enroll >> Make New Request
In the Certificate Type drop-down list, select OCSPSignerEndEntityProfile
In the CA drop-down list, select Root CA
In the Key-pair generation selection, select Provided by user
Click Browse and locate the CSR file that was created from the keybindings page, the file should be named RootCA.pkcs10.pem
In the CN, Common name field, enter RootCAOCSP
In the Username field, enter RootCAOCSP
Click Download PEM full chain
Save the file as RootCAOCSP.pem
You have now issued a certificate specific for the OCSP responder to use when signing Root CA status inquiries.
Import the certificate into the OCSP responder
Open a browser and access the Admin Web Portal on your VA
Click VA Functions >> OCSP Responders
To the right of Target OCSP Responder, in the list, select RootCA
To the right of Certificate, click Browse
Locate the certificate that was downloaded in the previous section, the file should be named RootCAOCSP.pem
Click Import
In the RootCA row under the Actions column, click Enable
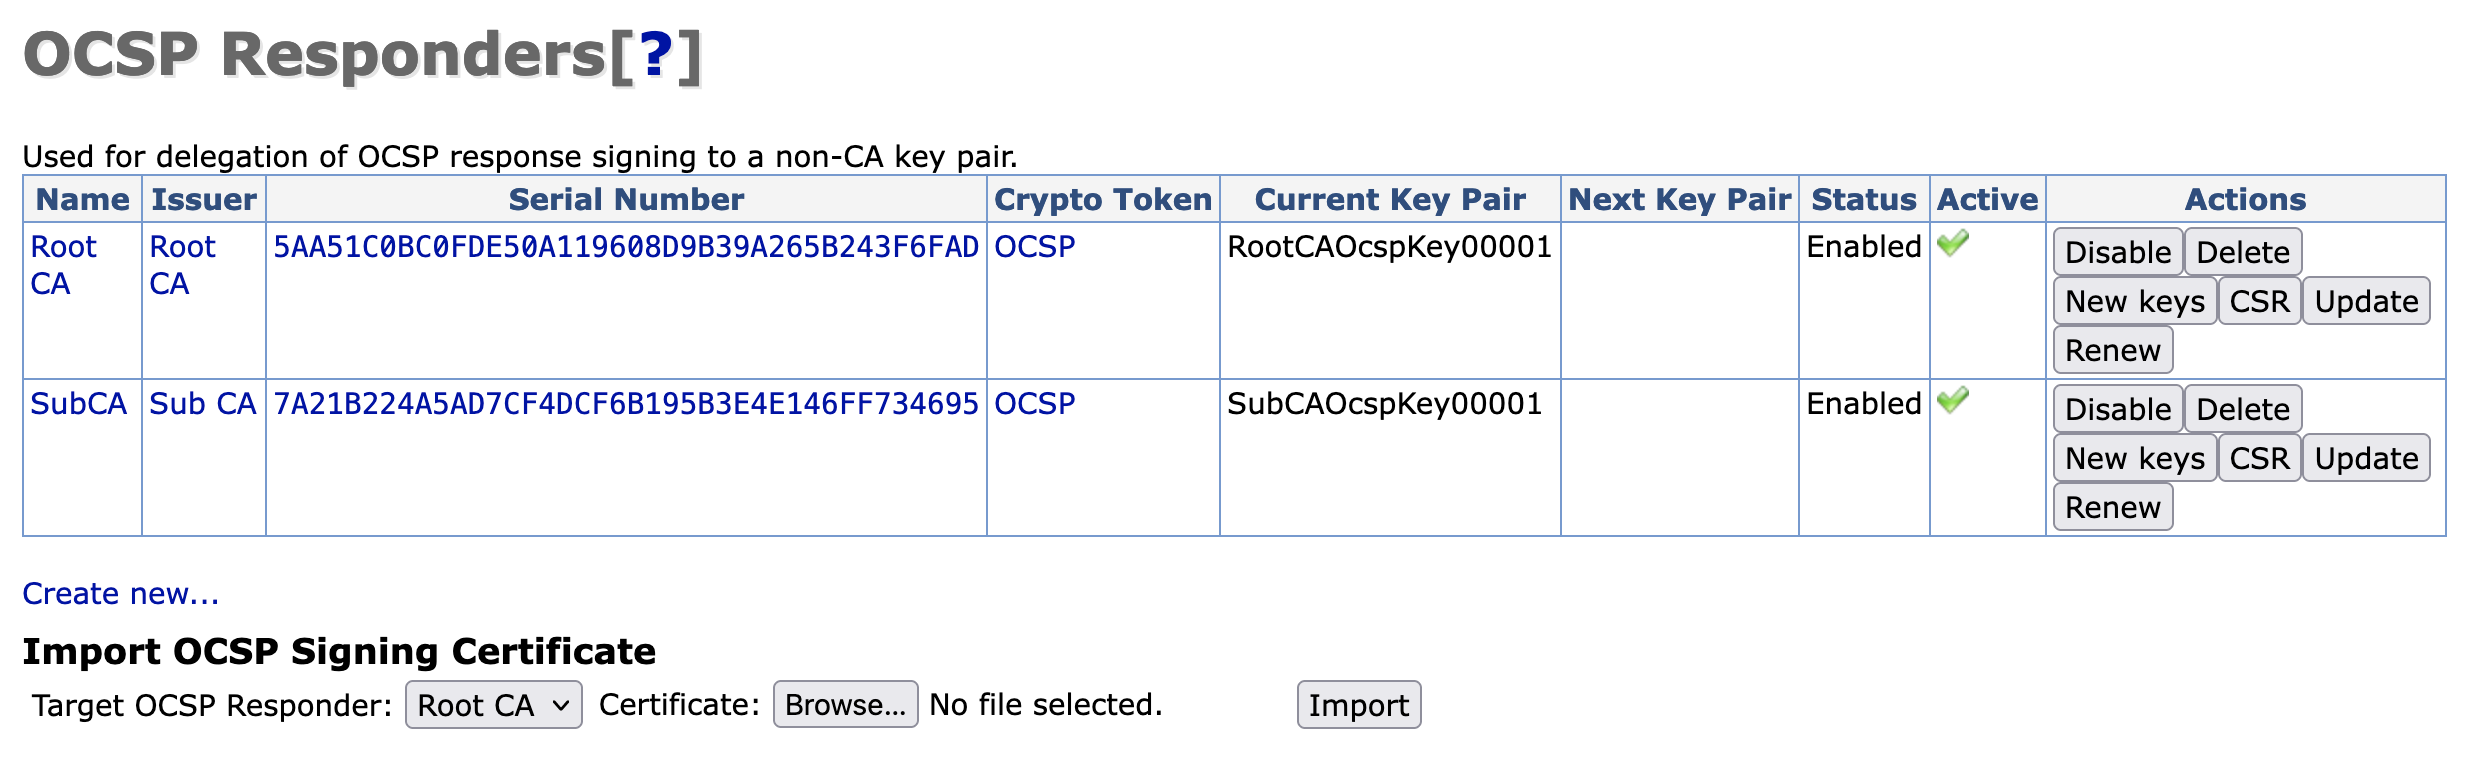
Two signing keys will be listed, afer the certificate is IMPORTED and ENABLED
Signing Certificates
You now have (2) CA certificates used to sign requests for OCSP inquiries.
The SubCA OCSP signing certificate will service requests for queries related to the certificates issued for the SubCA.
The RootCA OCSP signing certificate will service requests for queries related to the certificates issued for the RootCA.
You have laid the foundation for obtaining revocation information for the SubCA and optionally the RootCA. In subsequent sections "EJBCA Publishers”, "EJBCA Services" and "OCSP Check", we will learn how to "publish" the certificates we are interested in for obtaining certificate revocation information.