%20(500%20x%20162%20px)(1).png)
Key Recovery Workflow
The Key Recovery workflow is described in the following sections:
Introduction
EJBCA Key Recovery
Slide Deck: EJBCA Key Recovery
Overview: This lab consists of a few steps.
The first step to enabling key recovery is to turn key recovery on for the EJBCA instance.
The second step is to enable Key Recovery for an End-Entity profile. Once this is done, private keys will be escrowed for any entry created with that profile.
Remember the Use, Default=, Reuse Old Cert, and Required checkboxes perform different functions when configuring key recovery.
Slide Reference
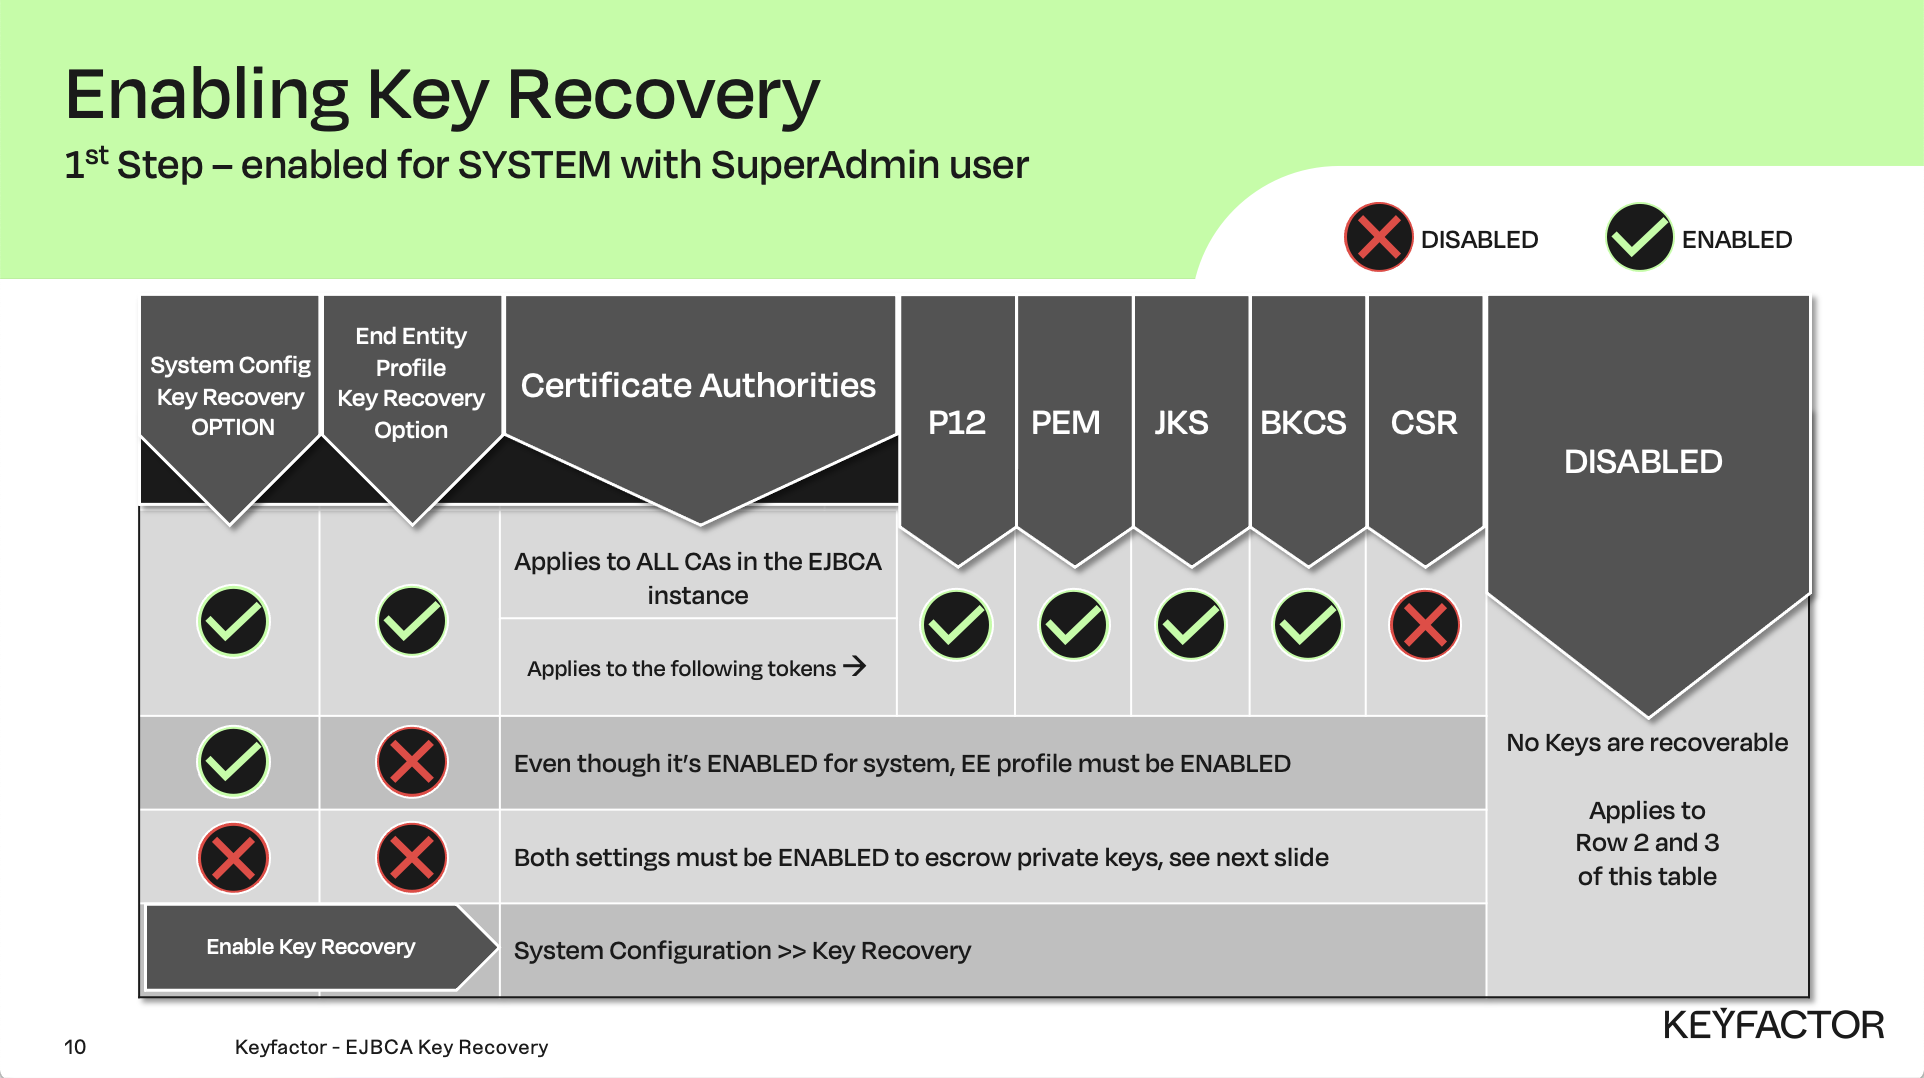
Enable Key Recovery at the system level
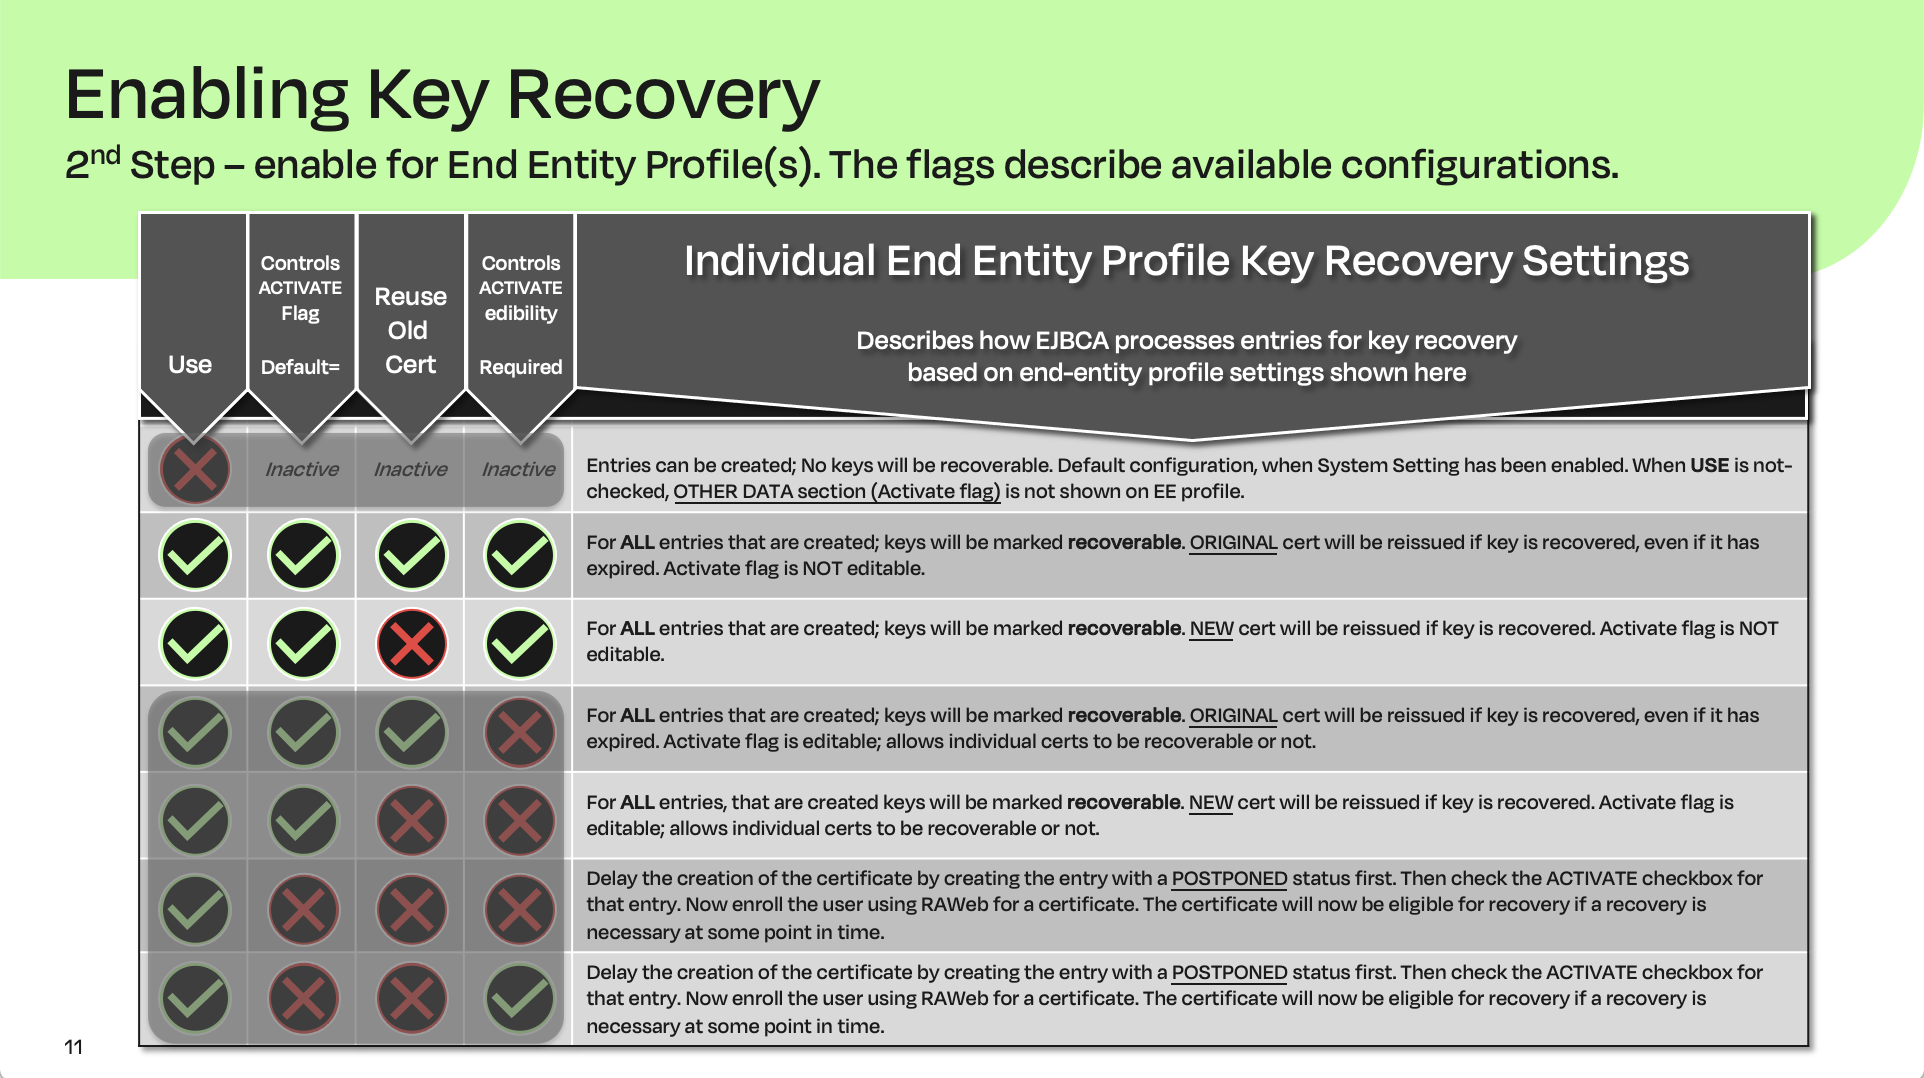
Enable Key Recovery on a particular End Entity profile
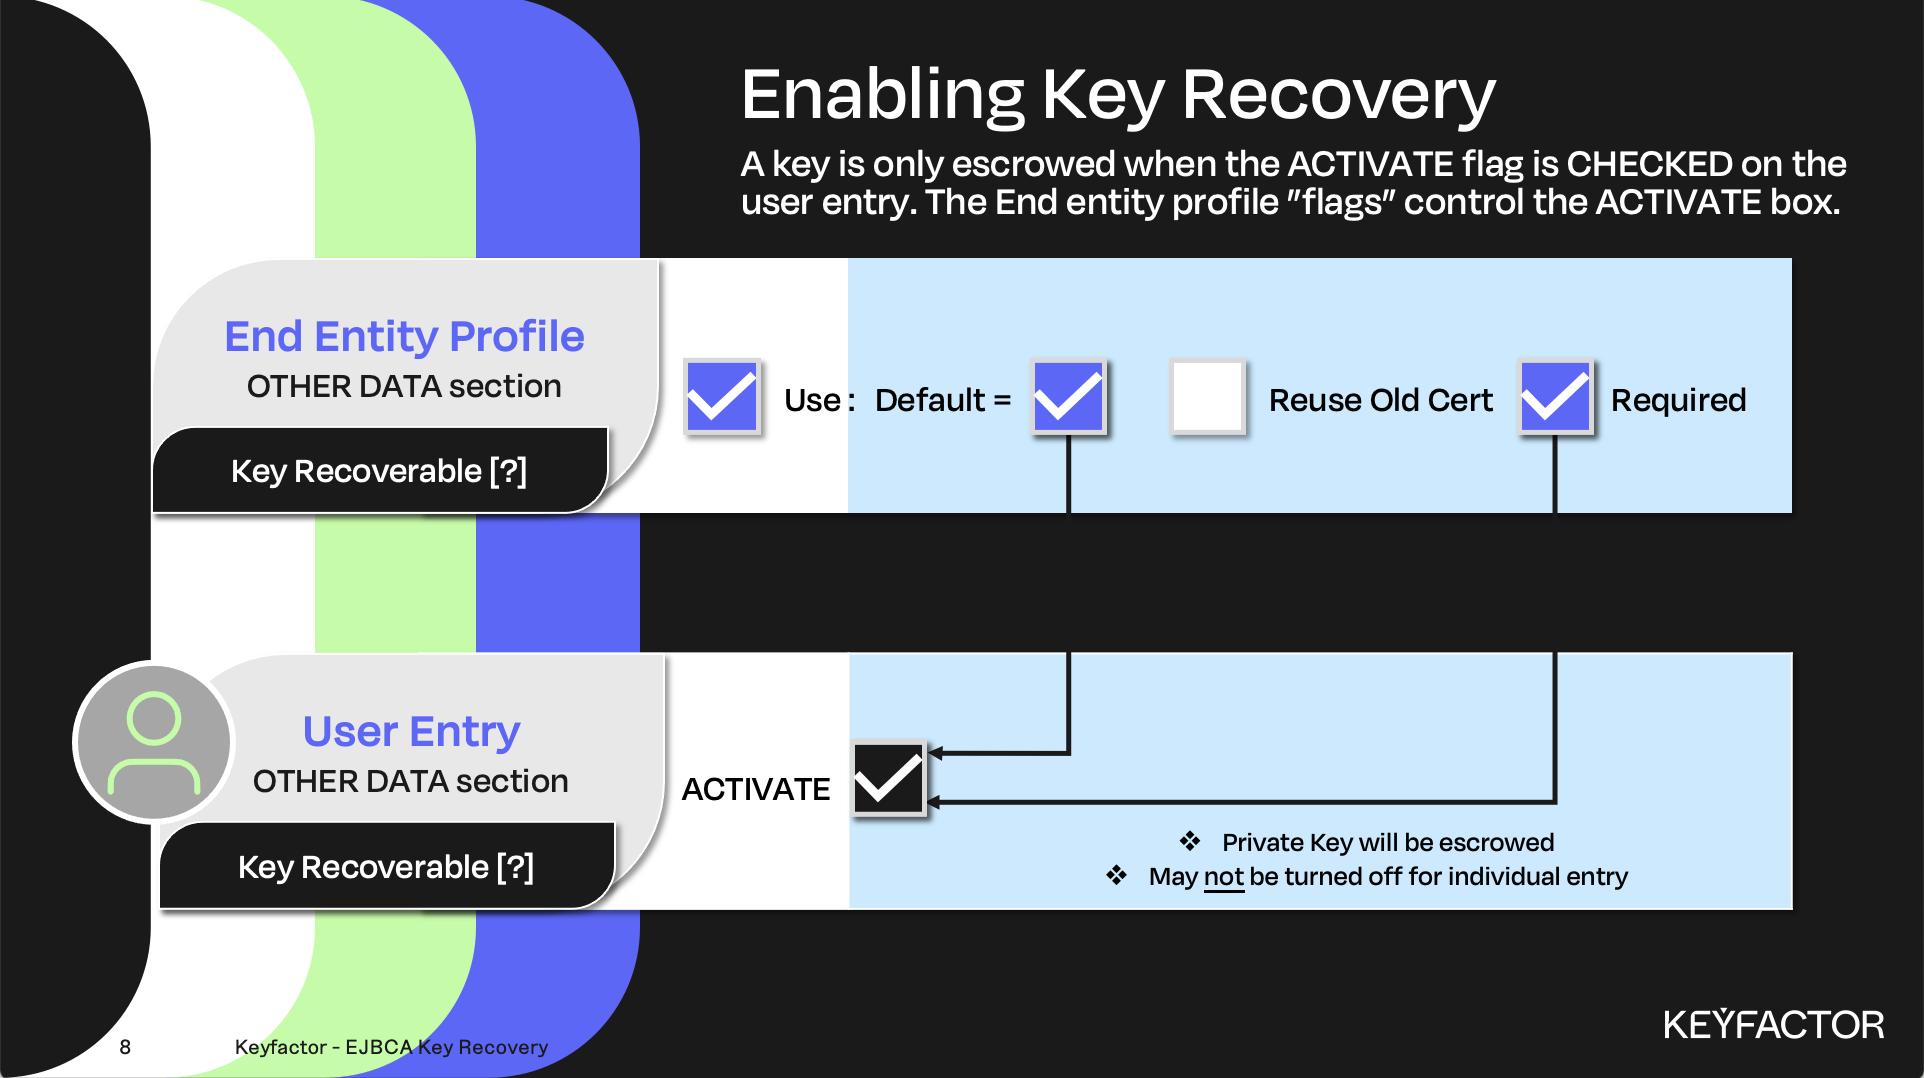
Activate checkbox is controlled by End Entity profile settings
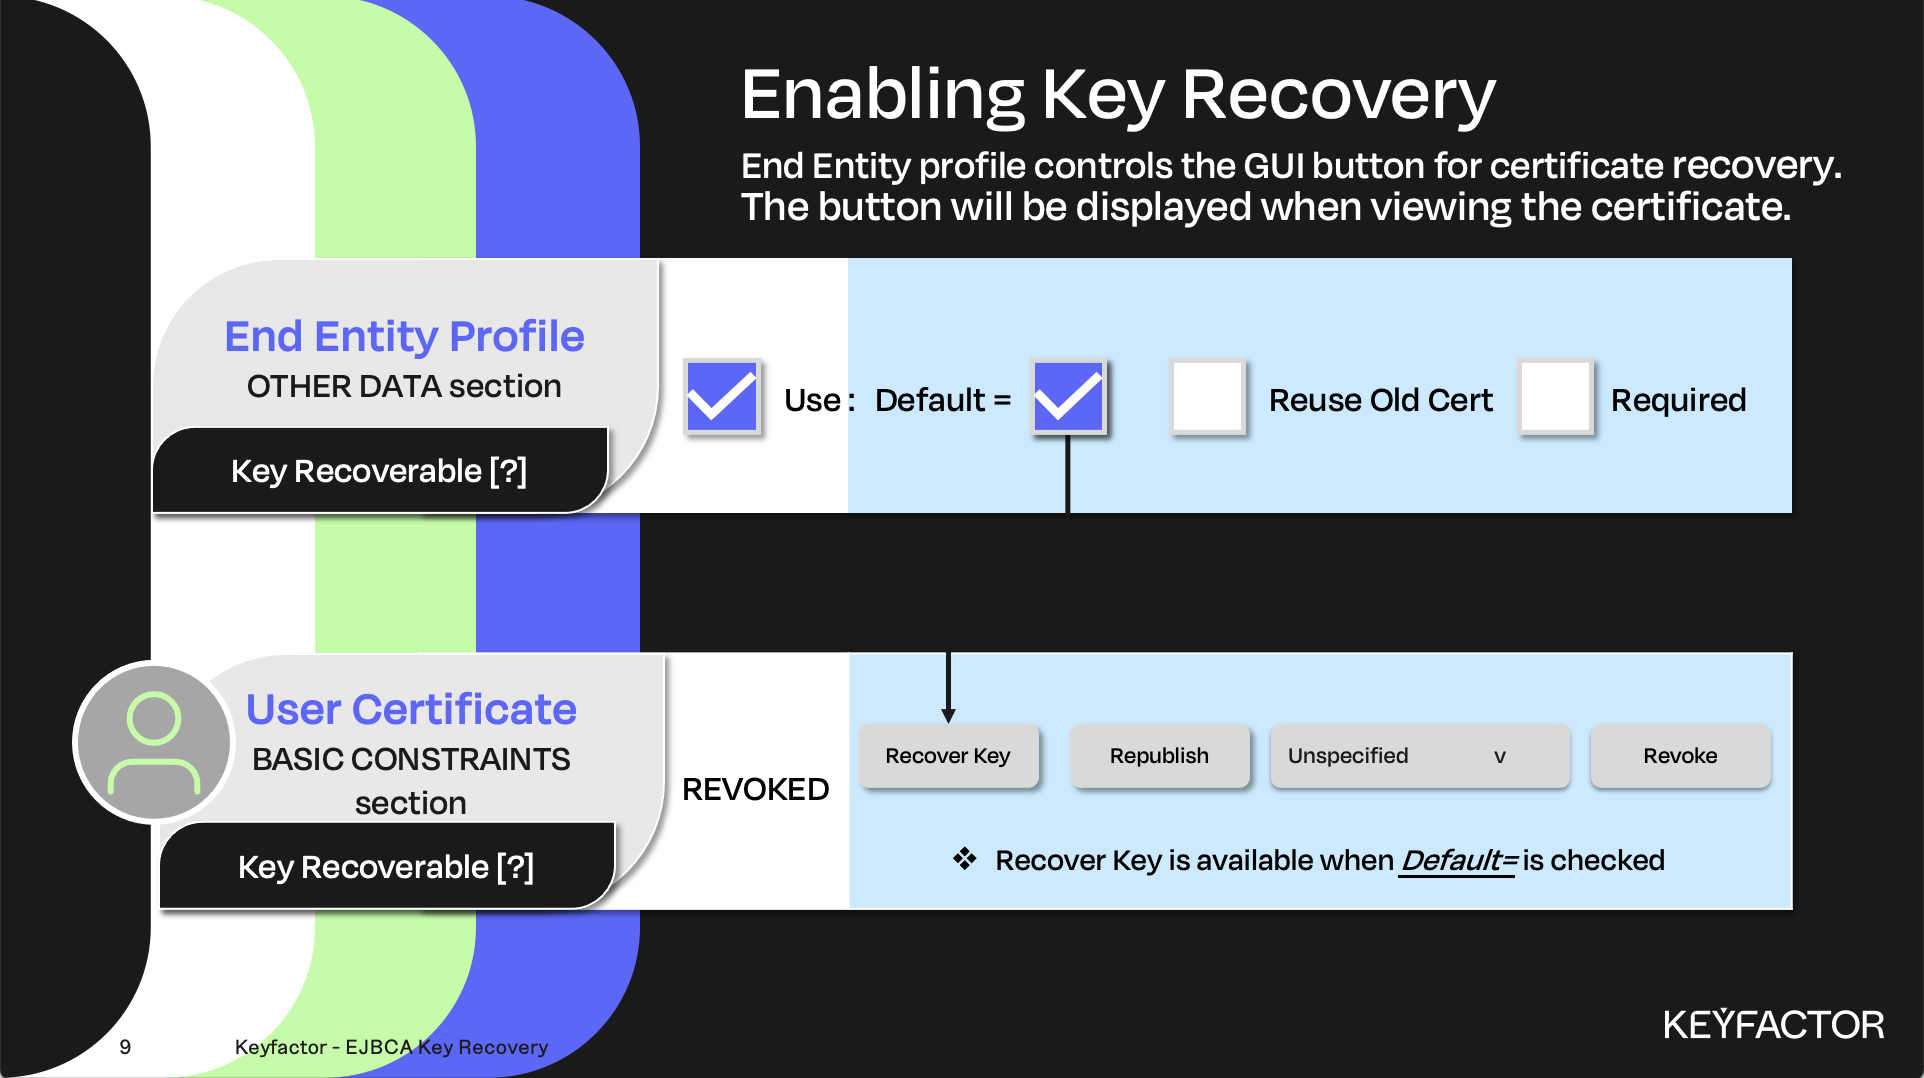
Recover Key option is controlled by Default checkbox on End Entity profile
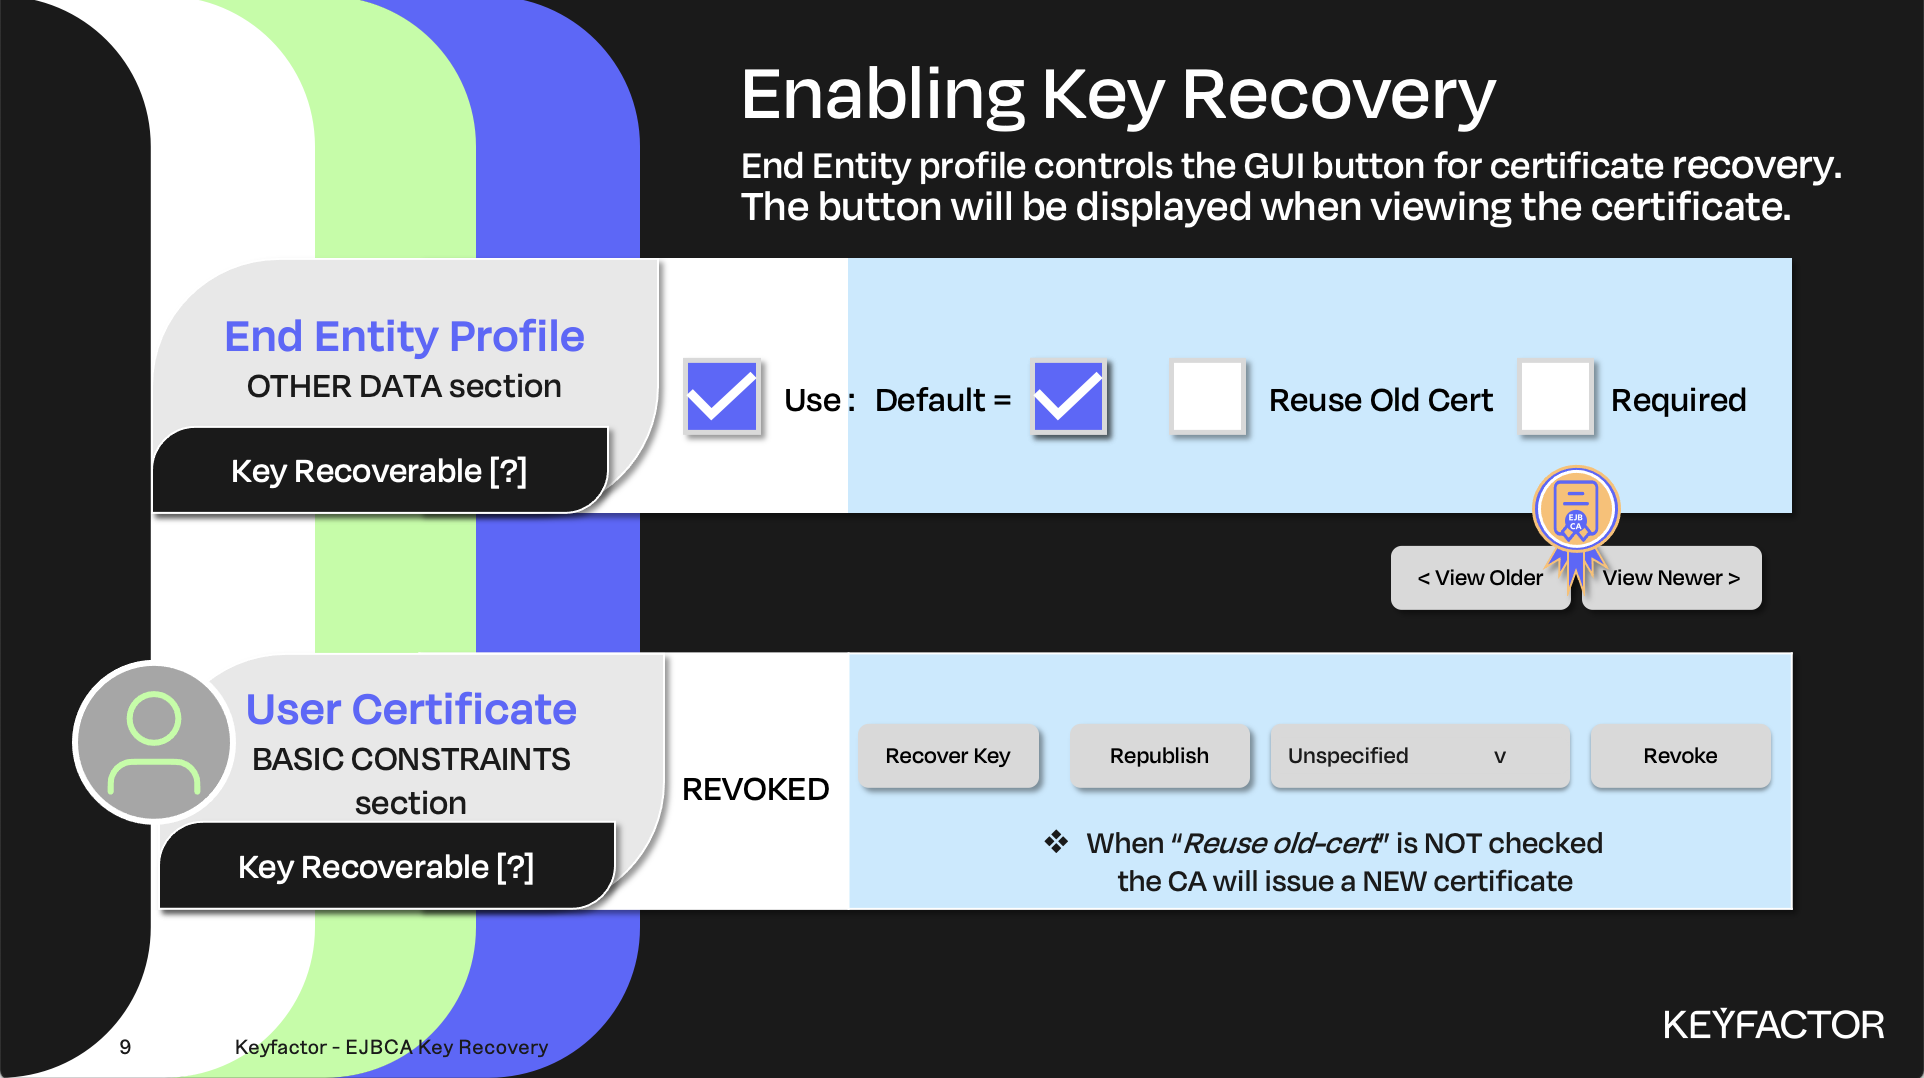
Multiple certificates can be issued to an End Entity use View Older/Newer to page through them
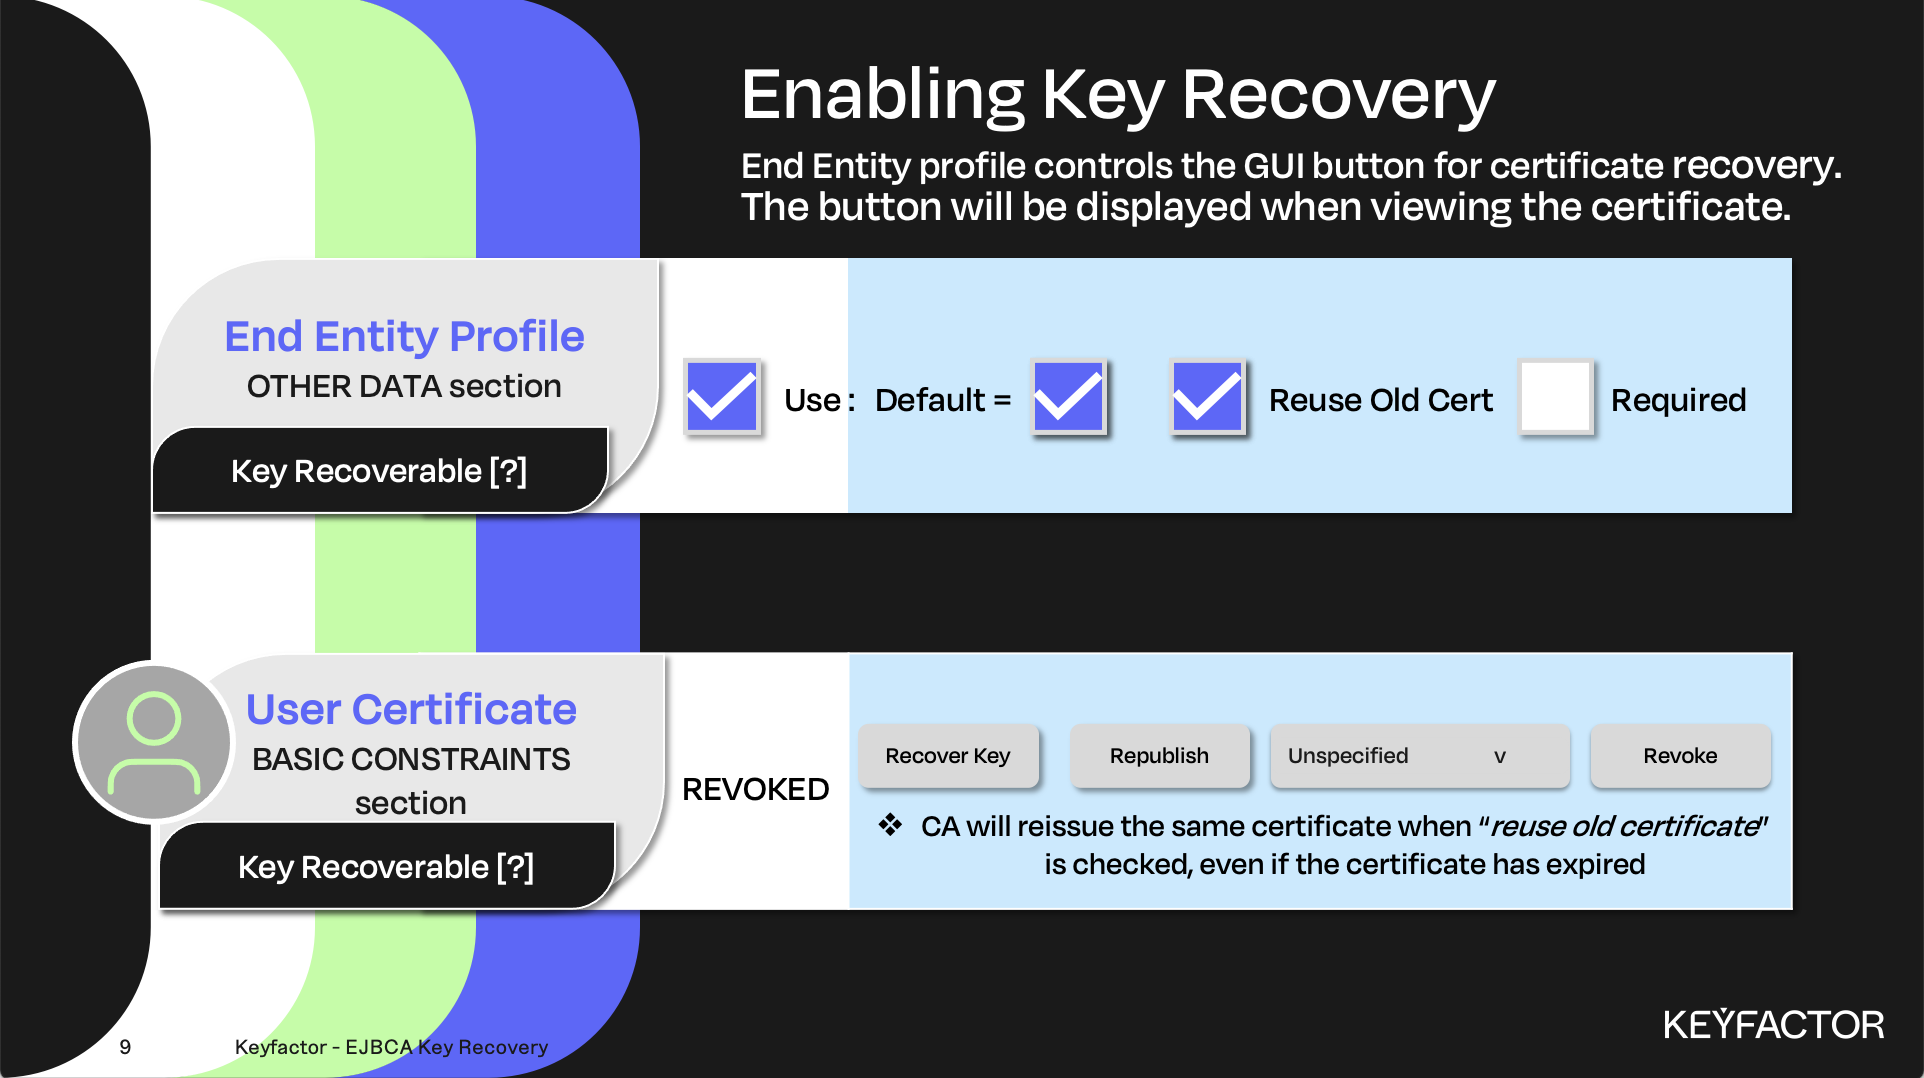
Reuse old certificate checkbox can be used to issue the same certificate during recovery
Reminder you can visit the Accessing Your Environment page for details on how to connect to your Admin web portal
Enabling Key Recovery
To enable key recovery, do the following:
Open a browser and access your Admin Web Portal
Click System Configuration >> System Configuration
Click on the Basic Configurations tab
In the Enable Key Recovery field, select Activate
Click Save
Edit the Profiles
To edit the profiles, do the following:
Open a browser and access your Admin Web Portal
Click CA Functions >> Certificate Profiles
For the KeyrecoveryCertificateProfile, click Edit
In the Available CAs list, select Sub CA
Click Save
Click RA Functions >> End Entity Profiles
In the List of End Entity Profiles list, select KeyrecoveryEndEntityProfile
Click Edit End Entity Profile
In the Key Recoverable field, select Use, Default and Required
Click Save
Reminder you can visit the Accessing Your Environment page for details on how to connect to your RA web portal
Issue Certificate
To issue the certificate, do the following:
Open a browser and click RA Web, from the ribbon menu across the top of page
Click Enroll >> Make New Request
In the Certificate Type drop-down list, select KeyrecoveryEndEntityProfile
In the Key-pair generation selection, select By the CA
In the CN, Common name field, enter training_Keyrecovery
In the Username field, enter training_Keyrecovery
In the Enrollment code field, enter foo123
In the Confirm enrollment code field, enter foo123
Click Download PEM
The file will be downloaded as training_Keyrecovery.pem
Recover Key
To recover the key, do the following:
Open a browser and click RA Web, from the ribbon menu across the top of page
Click Search >> Certificates
If you can’t see the Search menu then click the hamburger menu in the upper right corner
In the Search for Certificates, enter training_Keyrecovery
Click on the View link for the end entity training_Keyrecovery
Click Recover Key
In the Enrollment Code field, enter foo123
In the Confirm enrollment code field, enter foo123
Click Confirm request
From RA Web click Enroll >> Use Username
In the Username field, enter training_Keyrecovery
In the Enrollment code field, enter foo123
Click Check
Click Download PKCS#12
Save the file as training_Keyrecovery.p12
Download both certificates as PEM files
To verify both certificates are using the same PRIVATE key, download the original certificate and the RECOVERED certificate, in the next step these will be compared
Open a browser and click RA Web, from the ribbon menu across the top of page
Click Search >> Certificates, enter Keyrecovery in the search field. Two certificates will be shown
In the End_Entity column select the first certificate by clicking on the “training_Keyrecovery” hyperlink
Scroll to the bottom of the page, and click on the 1st serial number hyperlink
Scroll to the bottom of the page, and click on Download as PEM. This will download the first certificate in PEM format with a name similar to certf51cabeaaf0fcaed9d3295fccaf155e1f84cdb5d-chain.pem
Repeat steps 2 - 5 for the 2nd serial number
Once you have BOTH certificates downloaded follow the steps in the next section to compare the modulus of each
Compare the Certificates
To compare the certificates, do the following:
Open a browser and click RA Web, from the ribbon menu across the top of page
Click on Tools >> Inspect certificate/CSR
Click Upload a file, click the Downloads folder and select the 1st file downloaded file (with the long name) in the previous section, click select
For the modulus field, (located in the RAW data section) record the value
Click Reset
Click Upload a file, click the Downloads folder and select the 2nd file downloaded (with the long name) in the previous
section, click selectFor the modulus field, (located in the RAW data section) record the value
Comparing the modulus from certificate 1 and certificate 2, the values should be the same. This indicates the recovered certificate is the same as the original certificate.
? Question and Answers ?