%20(500%20x%20162%20px)(1).png)
OCSP Check
Introduction
EJBCA OCSP Check
Slide Deck: EJBCA OCSP Check
Overview: In this lab the VA instance we created in an earlier module will be now be configured as an OCSP responder. There are multiple ways to configure your VA to service certificate status requests. In this lab we will be using the VA to host dedicated OCSP signing keys.
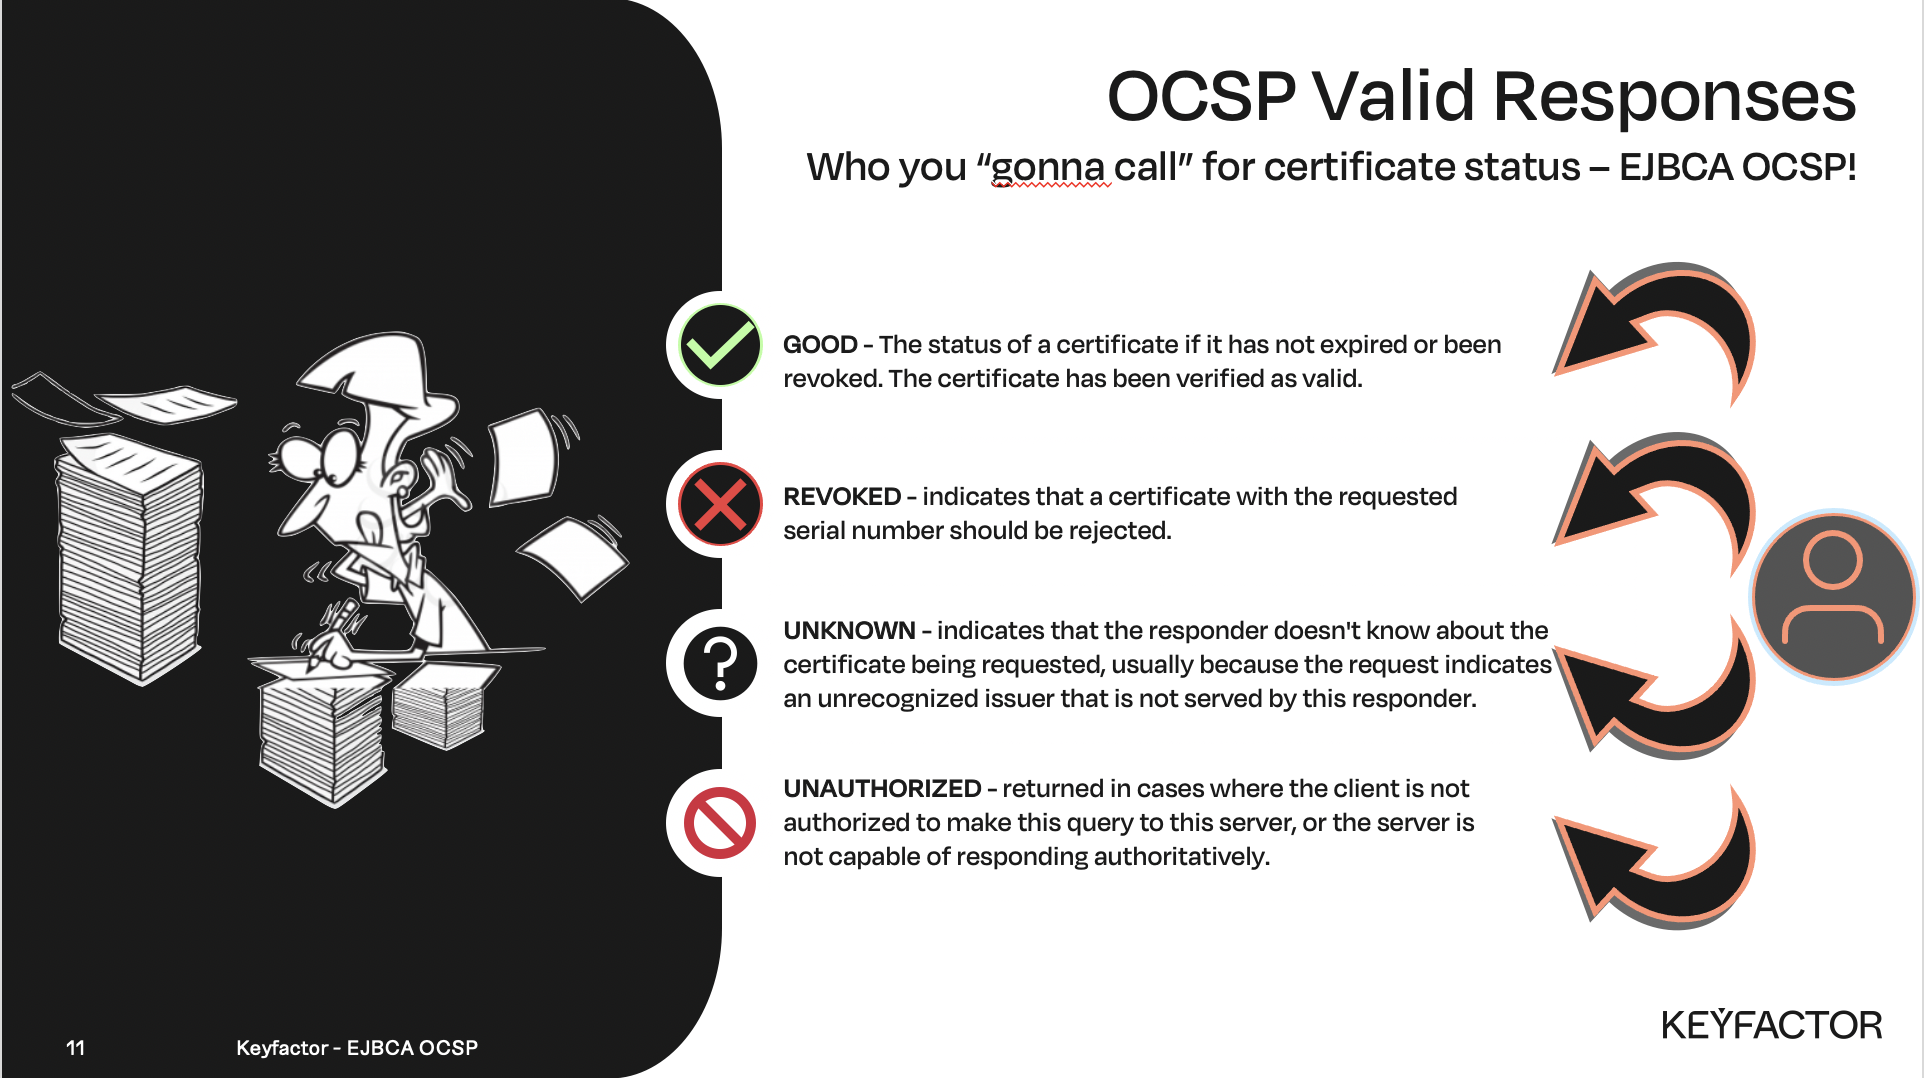
When client applications need the status of a certificate they will contact the VA and 1 of 4 responses can be returned
Good,
Revoked,
Unknown, or
Unauthorized
After contacting the VA, it is up to the client application at that point to decide if processing should continue. This lab will simulate a client application, by using OpenSSL to contact the VA.
The following exercise shows how to perform an OCSP check from a client to the VA with OpenSSL installed.
Note: In the event you do not have OpenSSL installed, it is also possible to perform the same check from the CA. The CA by default is capable of issuing OpenSSL commands.
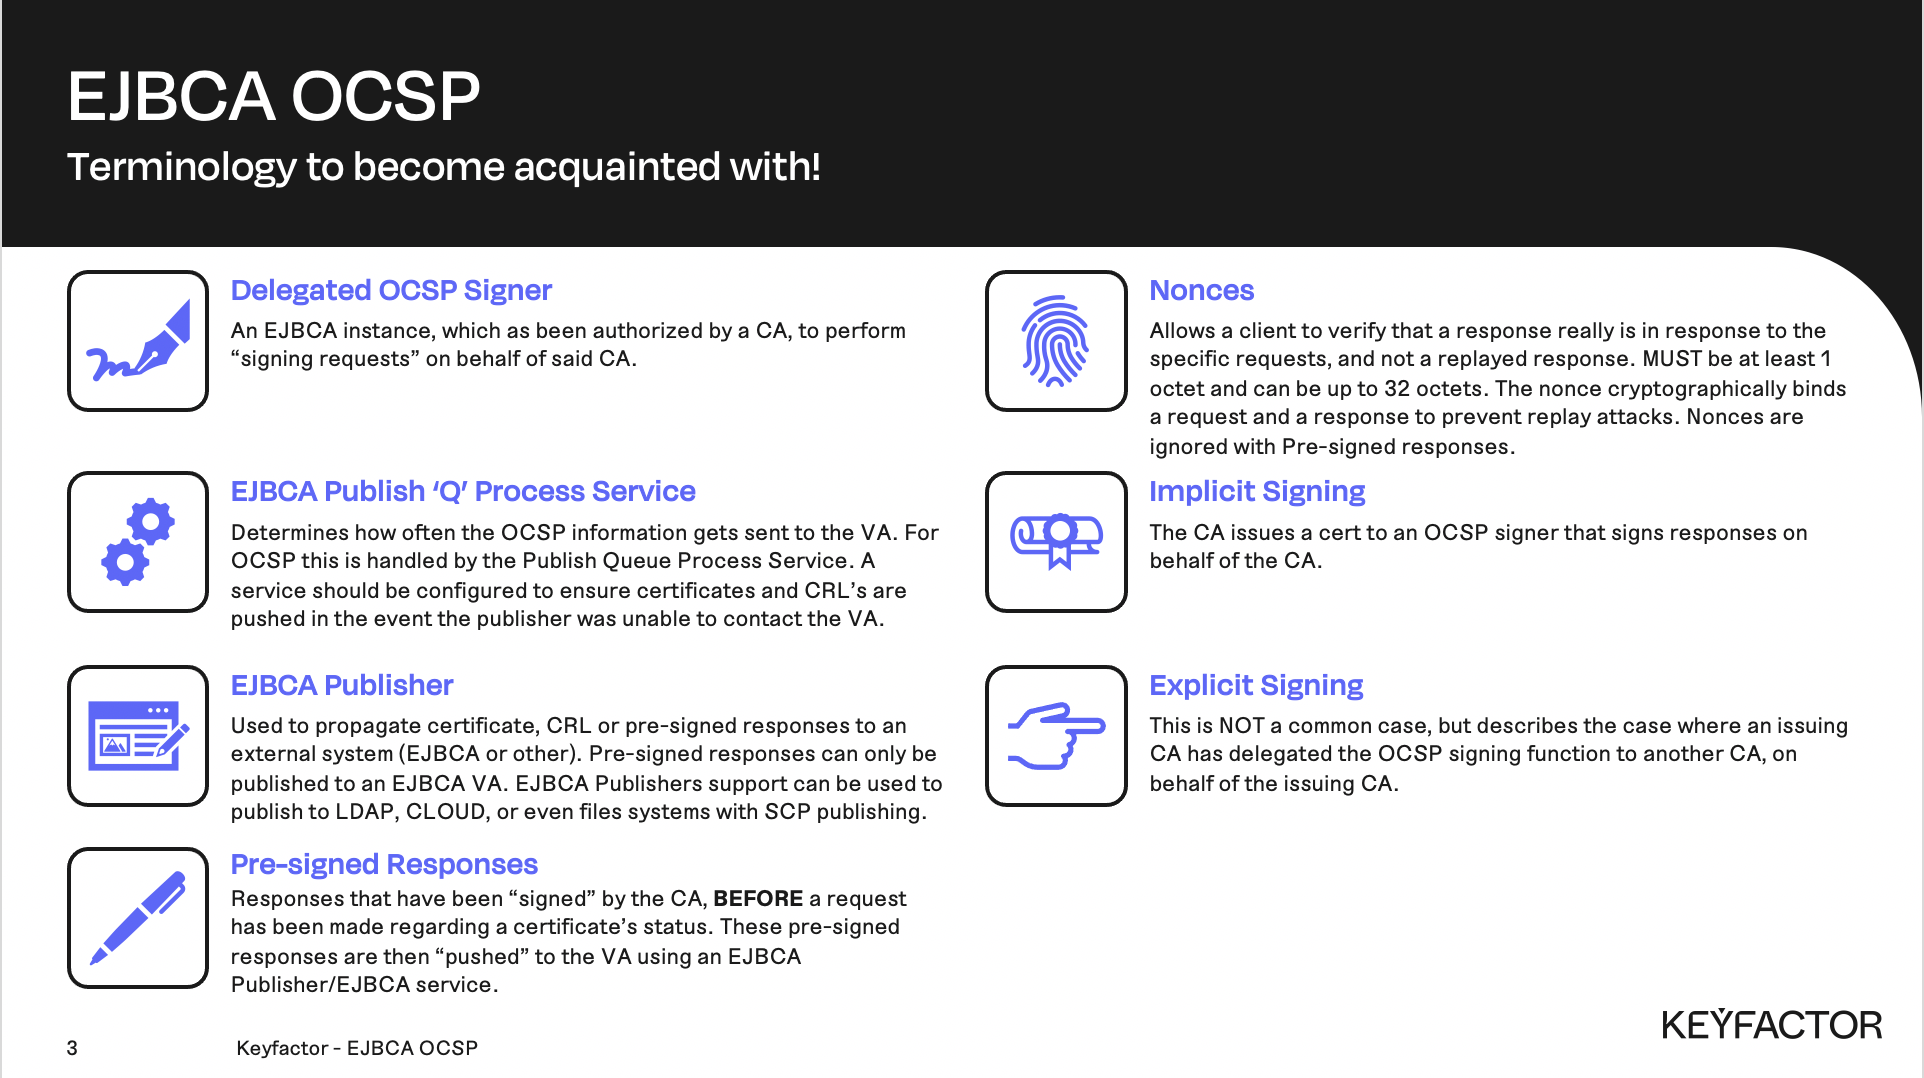
Online Certificate Status Protocol (OCSP) terminology
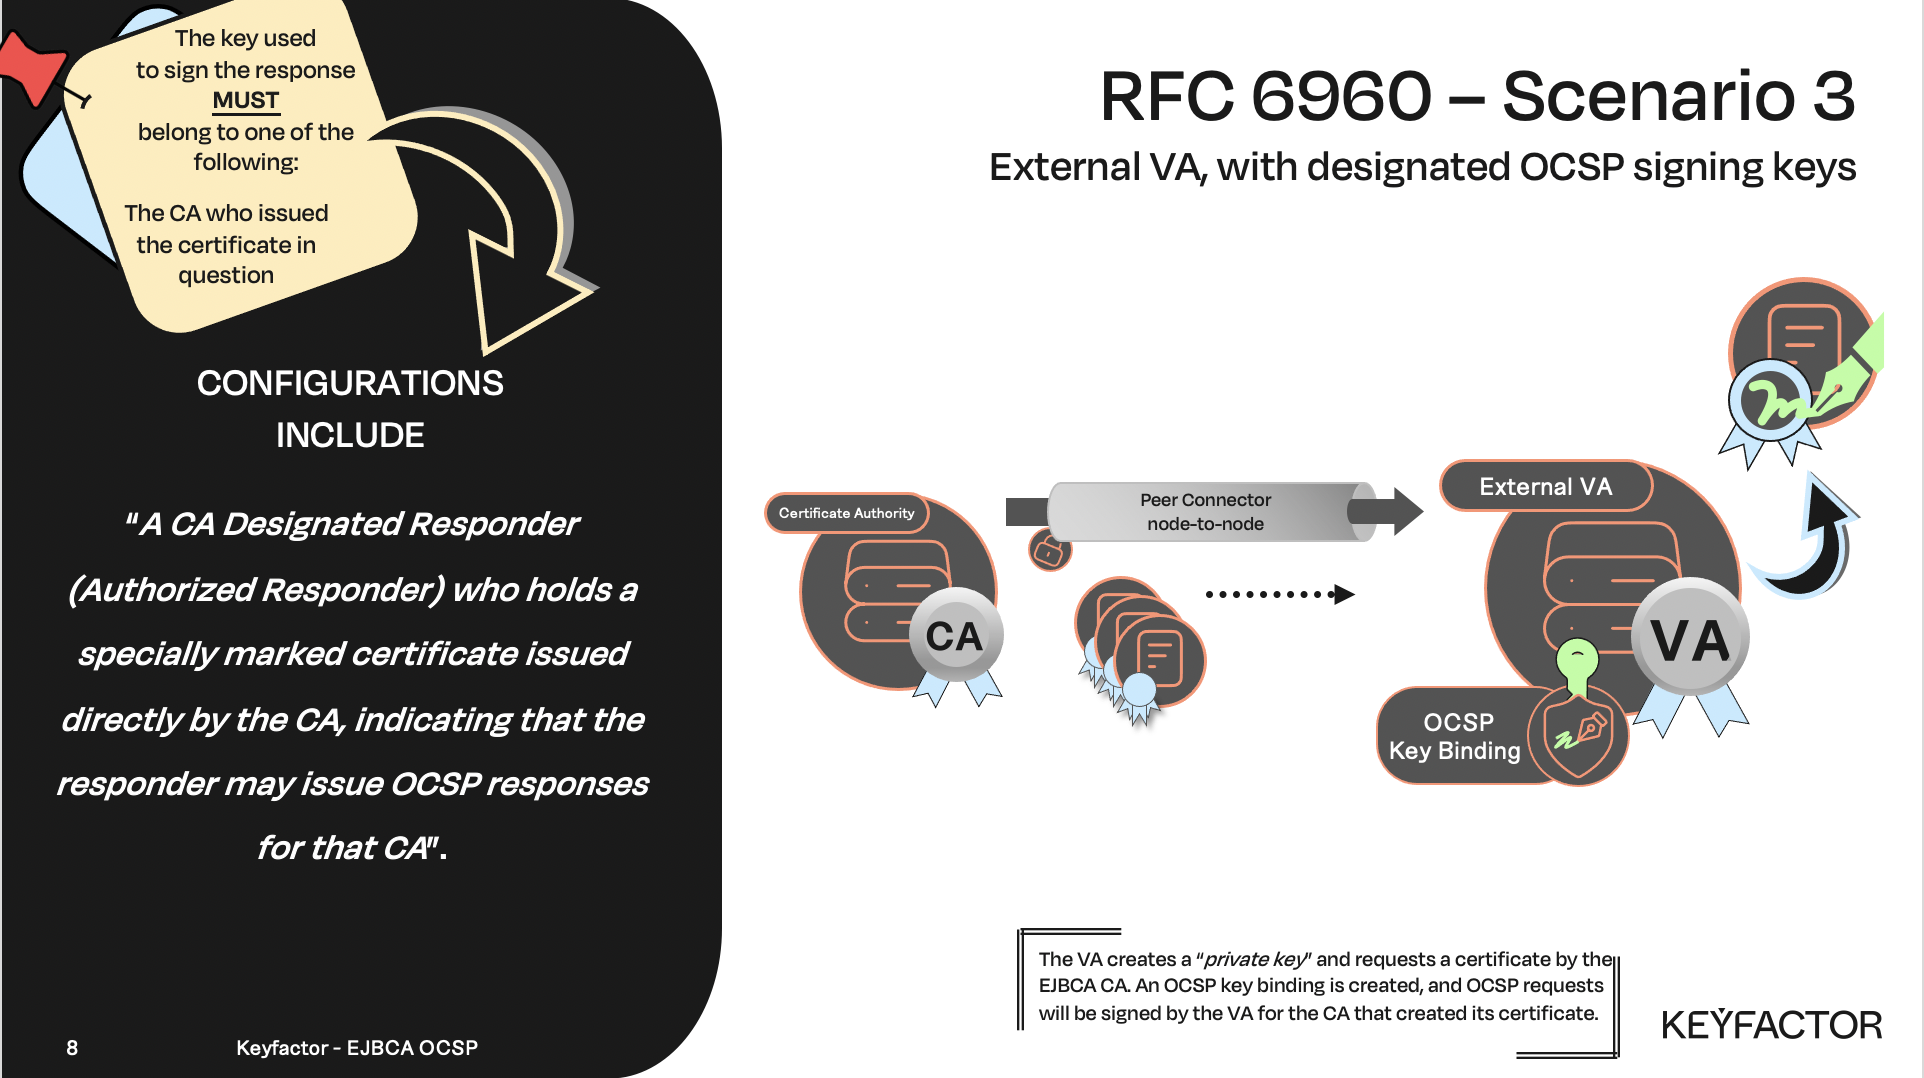
OCSP signer, with designated signing keys for a particular CA
OCSP signing responses, client application will need to respond accordingly
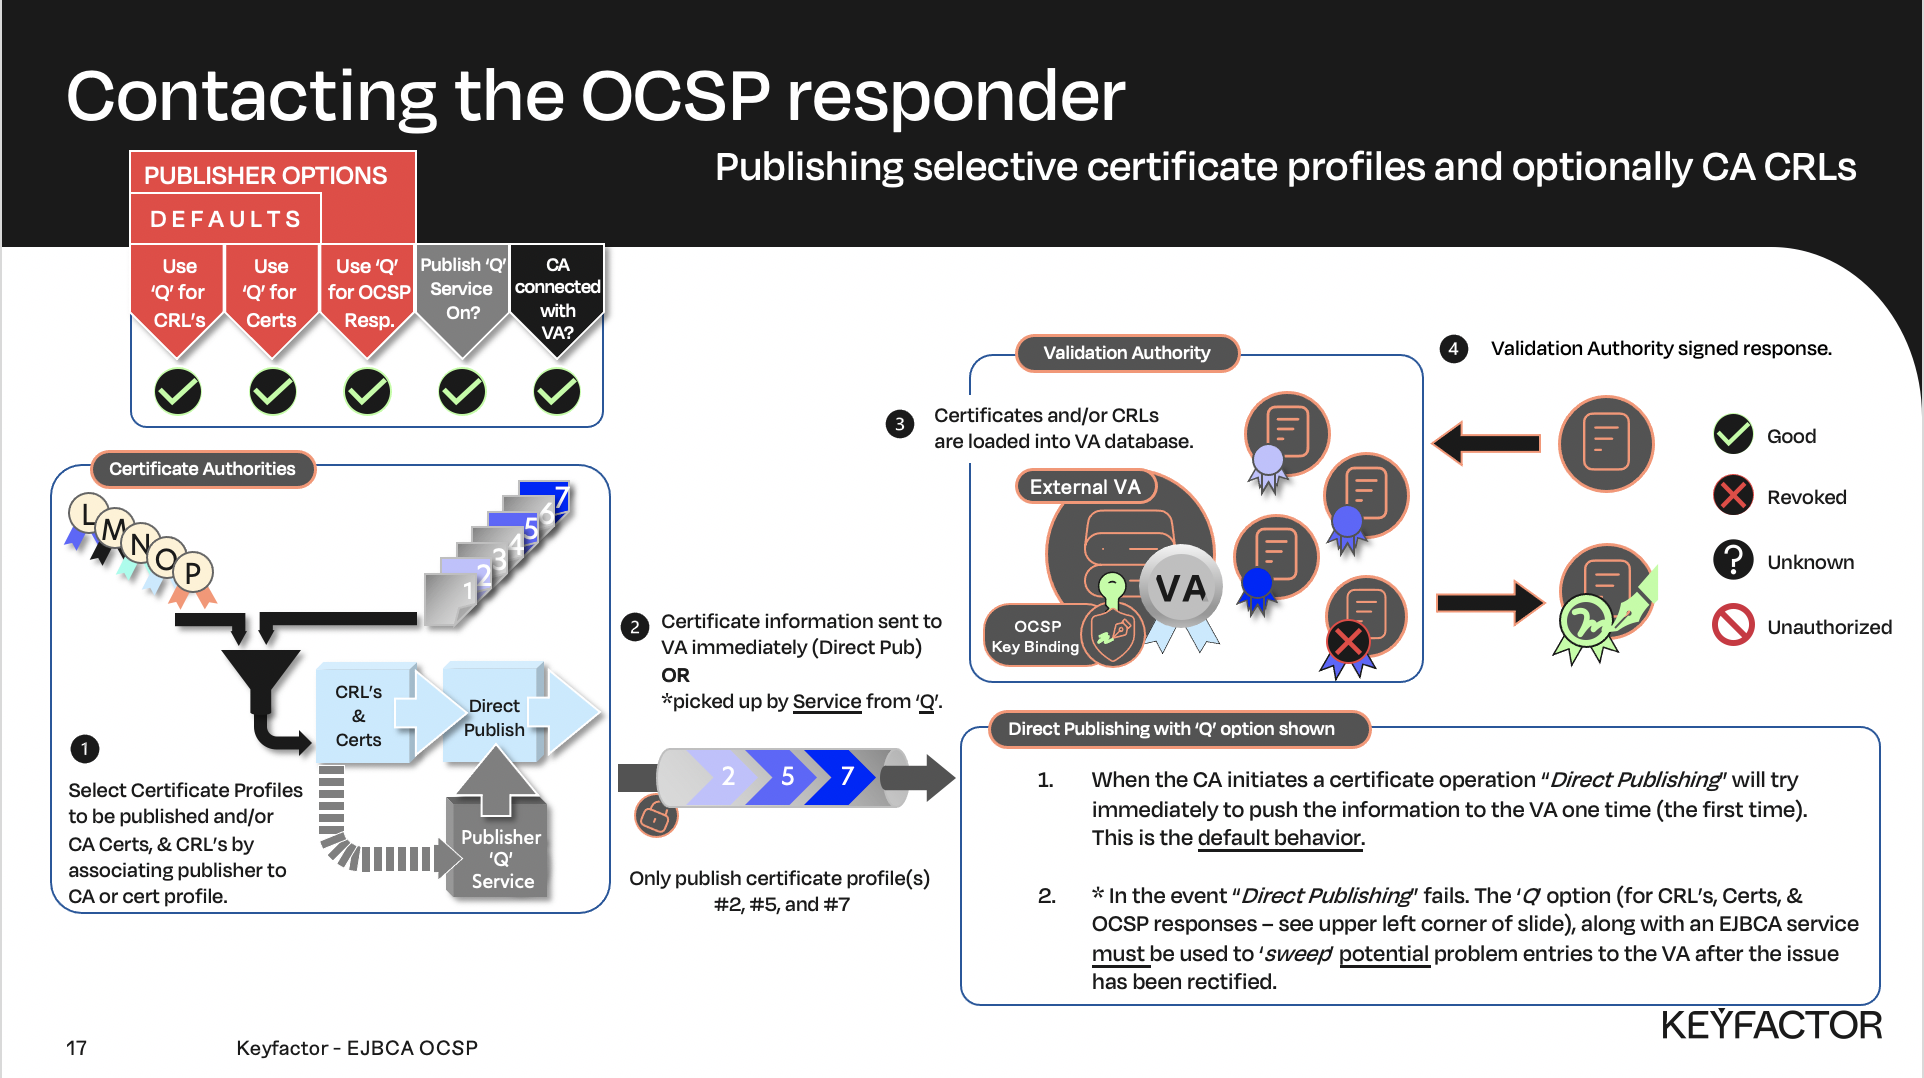
Data flow showing selected certificate profiles (#2, #5, and #7) being pushed to VA

Enable the VA Peer Publisher
First step is to enable the Sub CA to use the VA Publisher. Second step will push any certificates created and signed by the Sub CA that use the TLSClientCertificate profile to the VA. This is done by enabling the VA publisher on the TLSClientCertificate profile. Only certificates that use the TLSClientCertificate profile and are signed by the Sub CA will be pushed to the VA.
Reminder you can visit the Accessing Your Environment page for details on how to connect to your Admin web portal
Open a browser and access your Admin Web Portal on your CA
Click CA Functions >> Certification Authorities
Select Sub CA in the list of Certification Authorities
Click Edit CA
Under Publishers, deselect Multi Group and select only the VA Publisher
Click Save
Click CA Functions >> Certificate Profiles
Click Edit for the TLSClientCertificateProfile
Under Publishers, make sure VA Publisher is selected
Click Save
Issue a test certificate
Open a browser and click RA Web, from the ribbon menu across the top of page from your CA instance.
Click Enroll >> Make New Request
In the Certificate Type drop-down list, select TLSClientEndEntityProfile
In the CA drop-down list, select Sub CA
In the Key-pair generation selection, select By the CA
In the CN, Common name field, enter OCSPCheck
In the Username field, enter OCSPCheck
In the Enrollment code field, enter foo123
In the Confirm enrollment code field, enter foo123
Click Download PEM
Save the file as OCSPCheck.pem
Download CA certificates
Open a browser and access your Admin Web Portal on your CA
Click CA Functions >> CA Structure & CRLs
For the Root CA, download the certificate by clicking PEM in the Certificate column, and save the certificate as RootCA.cacert.pem
NOTE: The file was downloaded in the previous labs, the (2) will be appended to the filename. If it was the first time being downloaded it would not have the (2).
For the Sub CA level 1, download the certificate by clicking PEM in the Certificate column, and save the certificate as SubCA.cacert.pem
NOTE: The file was downloaded in the previous labs, the (1) will be appended to the filename. If it was the first time being downloaded it would not have the (1).
Test a Valid Certificate
All three files will be placed in the /home/sysadmin/Downloads directory (OCSPCheck.pem, RootCA.cacert.pem, SubCA.cacert.pem)
Open the TERMINAL application on the desktop.
cd ~/DownloadsRun the openssl command to check the status of the certificate.
openssl ocsp -issuer SubCA.cacert.pem -CAfile RootCA.cacert.pem -cert OCSPCheck.pem -req_text -resp_text -url http://va.keyfactor.training/ejbca/publicweb/status/ocspThe result should return that the certificate is valid.
Response verify OK
OCSPCheck.pem: good
If the status is unknown, then wait a minute for the CA to push the new information to the VA
Revoke and Test the Certificate
Open a browser and access your Admin Web Portal on your CA instance
Click RA Functions >> Search End Entities
In the Search end entity with username textbox type OCSPCheck and click Search
Click Certificate >> View on the OCSPCheck row
At the bottom, select Superseded in the drop box and click Revoke
Confirm by clicking OK
Check the bottom of the page and make sure the certificate is revoked
Click Close
Run the same command again:
openssl ocsp -issuer SubCA.cacert.pem -CAfile RootCA.cacert.pem -cert OCSPCheck.pem -req_text -resp_text -url http://va.keyfactor.training/ejbca/publicweb/status/ocspThe result should look something like this:
Response verify OK
OCSPCheck.pem: revoked
    This Update: Jan 01 12:00:00 2018 GMT
    Reason: superseded
    Revocation Time: Jan 01 11:00:00 2018 GMT
If the status is still good, then wait a minute for the CA to push the new information to the VA

Reminder you can visit the Accessing Your Environment page for details on how to connect to your Admin web portal for the VA
Restrict access to the OCSP responder
Open a browser and access your Admin Web Portal on your VA
Click VA Functions >> OCSP Responders
Click SubCA in the name column
Click Edit
Enable Request must be signed with a trusted certificate by ticking the checkbox
Click Save
Click System Configuration >> System Configuration on the menu
Scroll halfway down page, and click the button labeled Clear all caches in the Application Caches section
Click Save
Test the Restricted OCSP responder
All three files will be placed in the /home/sysadmin/Downloads directory (OCSPCheck.pem, RootCA.cacert.pem, SubCA.cacert.pem)
Open the TERMINAL application on the desktop
cd ~/DownloadsRun the openssl command to check the status of the certificate.
openssl ocsp -issuer SubCA.cacert.pem -CAfile RootCA.cacert.pem -cert OCSPCheck.pem -req_text -resp_text -url http://va.keyfactor.training/ejbca/publicweb/status/ocspConfirm the result looks something like this:
Responder Error: sigrequired (5)Remove the OSCP Responder Restriction
Open a browser and access your Admin Web Portal on your VA
Click VA Functions >> OCSP Responders
Click SubCA in the name column, click Edit
Disable Request must be signed with a trusted certificate by unticking the checkbox
Click Save
Click System Configuration >> System Configuration on the left hand menu
Scroll halfway down page, and click the button labeled Clear all caches
Click Save
Rerun the command above, the certificate response will report Revoked and Superseded
Response verify OK
OCSPCheck.pem: revoked
    This Update: Jan 01 12:00:00 2018 GMT
    Reason: superseded
    Revocation Time: Jan 01 11:00:00 2018 GMT
? Question and Answers ?