%20(500%20x%20162%20px)(1).png)
SCEP
Introduction
Integration - Simple Certificate Enrollment Protocol (SCEP)
Slide Deck: Integration
Overview: The goal of SCEP training is to learn how to issue certificates using the SCEP protocol utilizing CA Mode and RA Mode.
This lab demonstrates two different methods for creating a certificate using the SCEP protocol.
The first method creates a certificate for an entry that ALREADY exists in the database (a.k.a. CA Mode).
First, a certificate profile and an end entity profile will be created for use with the SCEP protocol.
Next, an entry will be added to the database. This will simulate pre-loaded entries for instance.
The third part of the lab creates the ALIASES that will be used by the SCEP client.
The final step is to ENABLE the SCEP protocol.
The SCEP client will contact an endpoint (alias) and request a certificate be generated.
The CA Mode will ONLY generate a certificate) with a PRE-existing entry.
The RA Mode will generate the entry and certificate at the same time.
Slide Reference
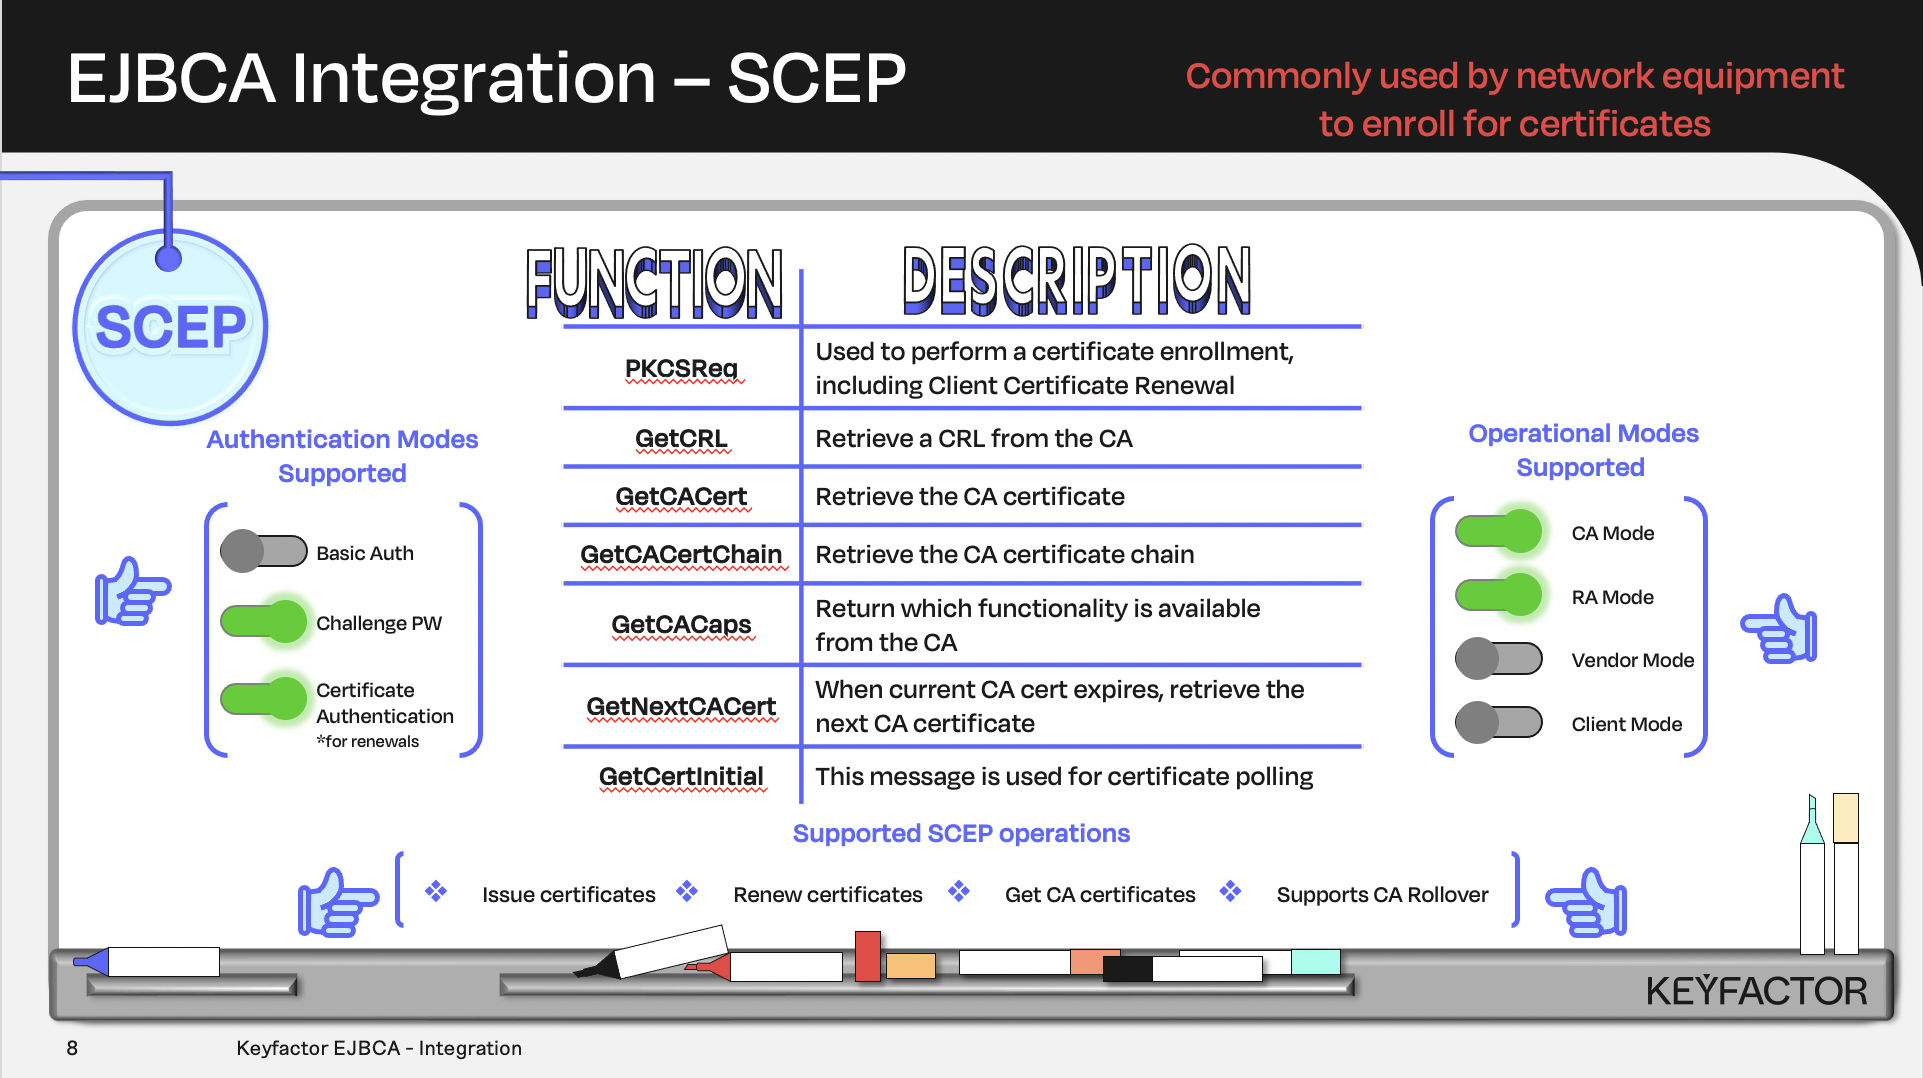
Certificate and CA operations available using Simple Certificate Enrollment Protocol (SCEP)
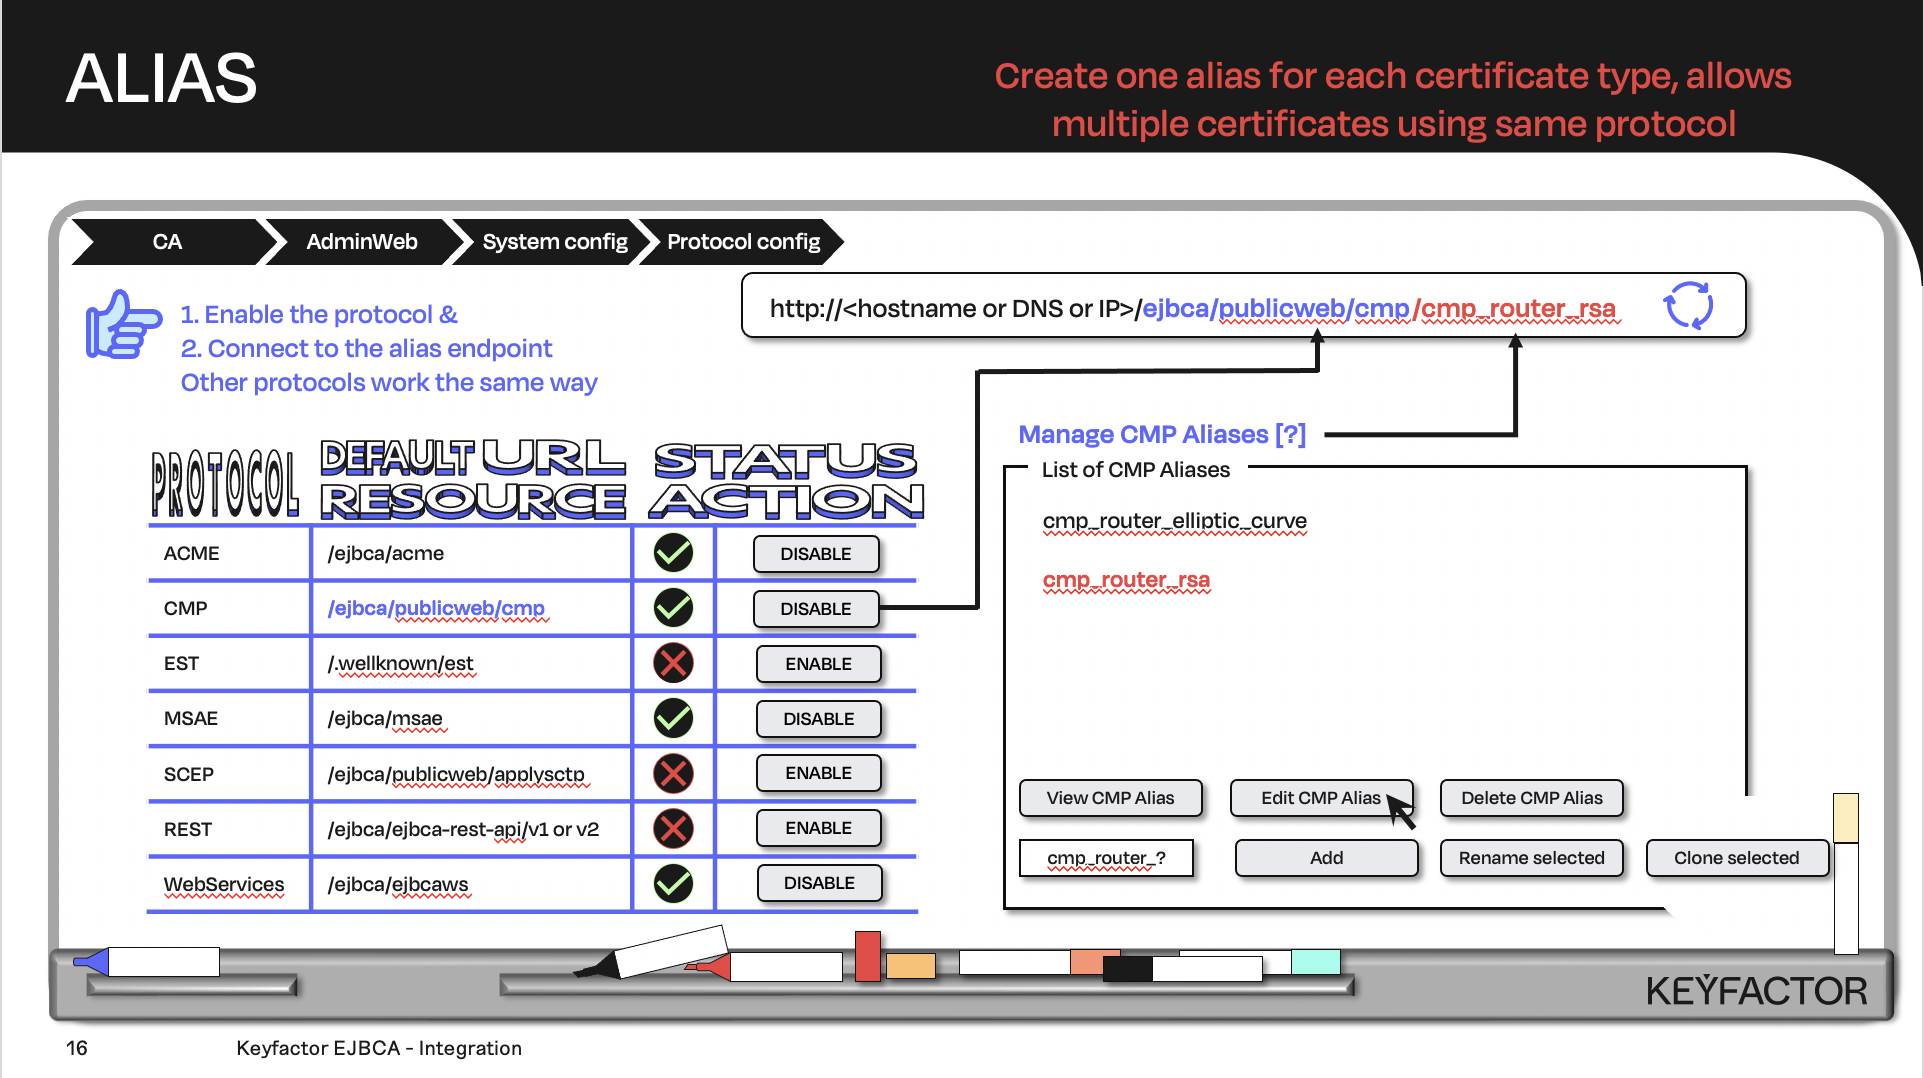
Create the URL with the default URL resource + the protocol alias; the client will contact the URL
Reminder you can visit the Accessing Your Environment page for details on how to connect to your Admin Web portal
Create a Certificate Profile for SCEP
Open a browser and access your Admin Web Portal
Click on CA Functions >> Certificate Profiles
Click on Clone to clone the TLSServerCertificateProfile certificate profile
Type in SCEP-RSA2k as the name of the certificate profile and click on Create from template
Click on Edit to edit the SCEP-RSA2k certificate profile
Uncheck the LDAP DN Order located in the Other data section
Select Sub CA in the list of Available CAs
Click on Save
Create an End Entity Profile for SCEP
Click on RA Functions >> End Entity Profiles
Fill in SCEP-RSA2k as the profile name and click on Add profile
Select SCEP-RSA2k in the list of end entity profiles and click on Edit End Entity Profile
In the Subject DN Attributes list, select O, Organization and click Add
In the O, Organization field:
Enter the text PrimeKey Solutions AB
Select Required
Deselect Modifiable
In the Subject DN Attributes list, select C, Country (ISO 3166) and click Add
In the C, Country (ISO 3166) field:
Enter the text SE
Select Required
Deselect Modifiable
In the Subject Alternative Name drop-down, select DNS Name and click on Add
Choose SCEP-RSA2k as Default Certificate Profile
Select SCEP-RSA2k in the list of Available Certificate Profiles
Choose Sub CA as Default CA
Chose Sub CA in the list of Available CAs
Choose User Generated in the list of Available Tokens
Click on Save
Create SCEP Aliases for CA Mode
Click on System Configuration >> SCEP Configuration
Click on Add to add a new alias
For the name field enter scepca
The alias name is CaSe SEnsiTive - please use all lowercase
Check the box for Allow Client Certificate Renewal (Enterprise Edition):
Check the box for Allow Client Certificate Renewal using old key (Enterprise Edition):
Click on Save
Create SCEP Aliases for RA Mode
Click on Add to add a new alias
Change the Operational Mode to RA
The alias name is CaSe SEnsiTive - please use all lowercase
For the name field enter scepra
Select SCEP-RSA2k for the RA end Entity Profile
Enter foo123 for RA authentication password
Click on Save
Enable the SCEP Protocol
Click on System Configuration >> System Configuration
Click on the Protocol Configuration tab
Click on Enable for the SCEP protocol
Reminder you can visit the Accessing Your Environment page for details on how to connect via SSH
Enroll for Certificate Using SCEP CA Mode
Create SCEP End Entity for CA Mode
Create an end entity that will be enrolled using SCEP in Operational Mode: CA. Remember when using CA mode, the entry MUST EXIST in the database PRIOR to the certificate being requested. The following steps will add the end entity to the database.
Open a browser and access the Admin Web
Click RA Functions >> Add End Entity
In the End Entity Profile list, select SCEP-RSA2k
In the Username field, enter scep-ca-test.primekey.training
In the Password field, enter foo123
In the Confirm Password field, enter foo123
In the CN, Common name field, enter scep-ca-test.primekey.training
In the DNS Name field, enter scep-ca-test.primekey.training
In the Certificate Profile list, select SCEP-RSA2k
In the CA list, select Sub CA
In the Token list, select User Generated
Click Add
Once the end entity has been added to the database, follow these steps to enroll for a certificate.
From the desktop open the TERMINAL application
cd /home/sysadmin/sscep-0.10.0Edit the SCEP CA mode configuration file
vim scep-ca-csr.confAdd the following to the file:
[ req ]
default_bits = 2048
distinguished_name = req_distinguished_name
req_extensions = req_ext
attributes = req_attributes
prompt = no

[ req_distinguished_name ]
C = SE
O = PrimeKey Solutions AB
CN = scep-ca-test.primekey.training

[ req_attributes ]
challengePassword              = foo123

[ req_ext ]
subjectAltName = @alt_names

[alt_names]
DNS.1 = scep-ca-test.primekey.training
Save and close the file with :wq!
Create the CSR to enroll with the SCEP CA alias
openssl req -new -config scep-ca-csr.conf -newkey rsa:2048 -nodes -keyout scep-ca-csr.key -out scep-ca-csr.csrObtain the CA cert using SCEP
./sscep getca -u "http://ca.keyfactor.training/ejbca/publicweb/apply/scep/scepca/pkiclient.exe" -i Sub%20CA -c subca.crtEnroll for a certificate using the SCEP CA mode alias:
./sscep enroll -u "http://ca.keyfactor.training/ejbca/publicweb/apply/scep/scepca/pkiclient.exe" -i Sub%20CA -k scep-ca-csr.key -r scep-ca-csr.csr -l scep-ca-test.primekey.training.crt -c subca.crt-1 -E aes256The following results should be displayed:
sscep: sending certificate request
sscep: valid response from server
sscep: reply transaction id: E56F27AD610FA4C6D386C501D52B7B9E
sscep: pkistatus: SUCCESS
Enroll for a Certificate using SCEP RA Mode
The second method of requesting a certificate with SCEP is to use RA Mode. When using RA mode the end entity and the certificate are created at the same time. The following steps will create an end entity and generate a certificate for that end entity.
Continue using the TERMINAL application
cd /home/sysadmin/sscep-0.10.0Edit the SCEP RA mode configuration file
vim scep-ra-csr.confAdd the following to the file:
[ req ]
default_bits = 2048
distinguished_name = req_distinguished_name
req_extensions = req_ext
attributes = req_attributes

prompt = no

[ req_distinguished_name ]
C = SE
O = PrimeKey Solutions AB
CN = scep-ra-test.primekey.training

[ req_attributes ]
challengePassword = foo123

[ req_ext ]
subjectAltName = @alt_names

[alt_names]
DNS.1 = scep-ra-test.primekey.training
Save and close the file with :wq!
Create the CSR to enroll with the SCEP RA alias
openssl req -new -config scep-ra-csr.conf -newkey rsa:2048 -nodes -keyout scep-ra-csr.key -out scep-ra-csr.csrEnroll for a certificate using the SCEP RA mode alias
./sscep enroll -u "http://ca.keyfactor.training/ejbca/publicweb/apply/scep/scepra/pkiclient.exe" -i Sub%20CA -k scep-ra-csr.key -r scep-ra-csr.csr -l scep-ra-test.primekey.training.crt -c subca.crt-1The following results should be displayed:
sscep: sending certificate request
sscep: valid response from server
sscep: reply transaction id: 1B312F860C4C0C0FF5D2142B83D6E24B
sscep: pkistatus: SUCCESS
? Question and Answers ?