%20(500%20x%20162%20px)(1).png)
Partitioned Approval Workflow
The PARTITIONED approval workflow is described in the following steps:
Introduction
EJBCA Approvals
Slide Deck: EJBCA Approvals
Overview: The PARTITIONED workflows are a more complicated form of approvals than the simple accumulative approval. Partitioned approvals should be used when you need to:
Create an approval workflow which is more complex than what you can achieve with a accumulative approval.
Enter data during the approval process which can be reviewed by other administrators and saved for audit purposes.
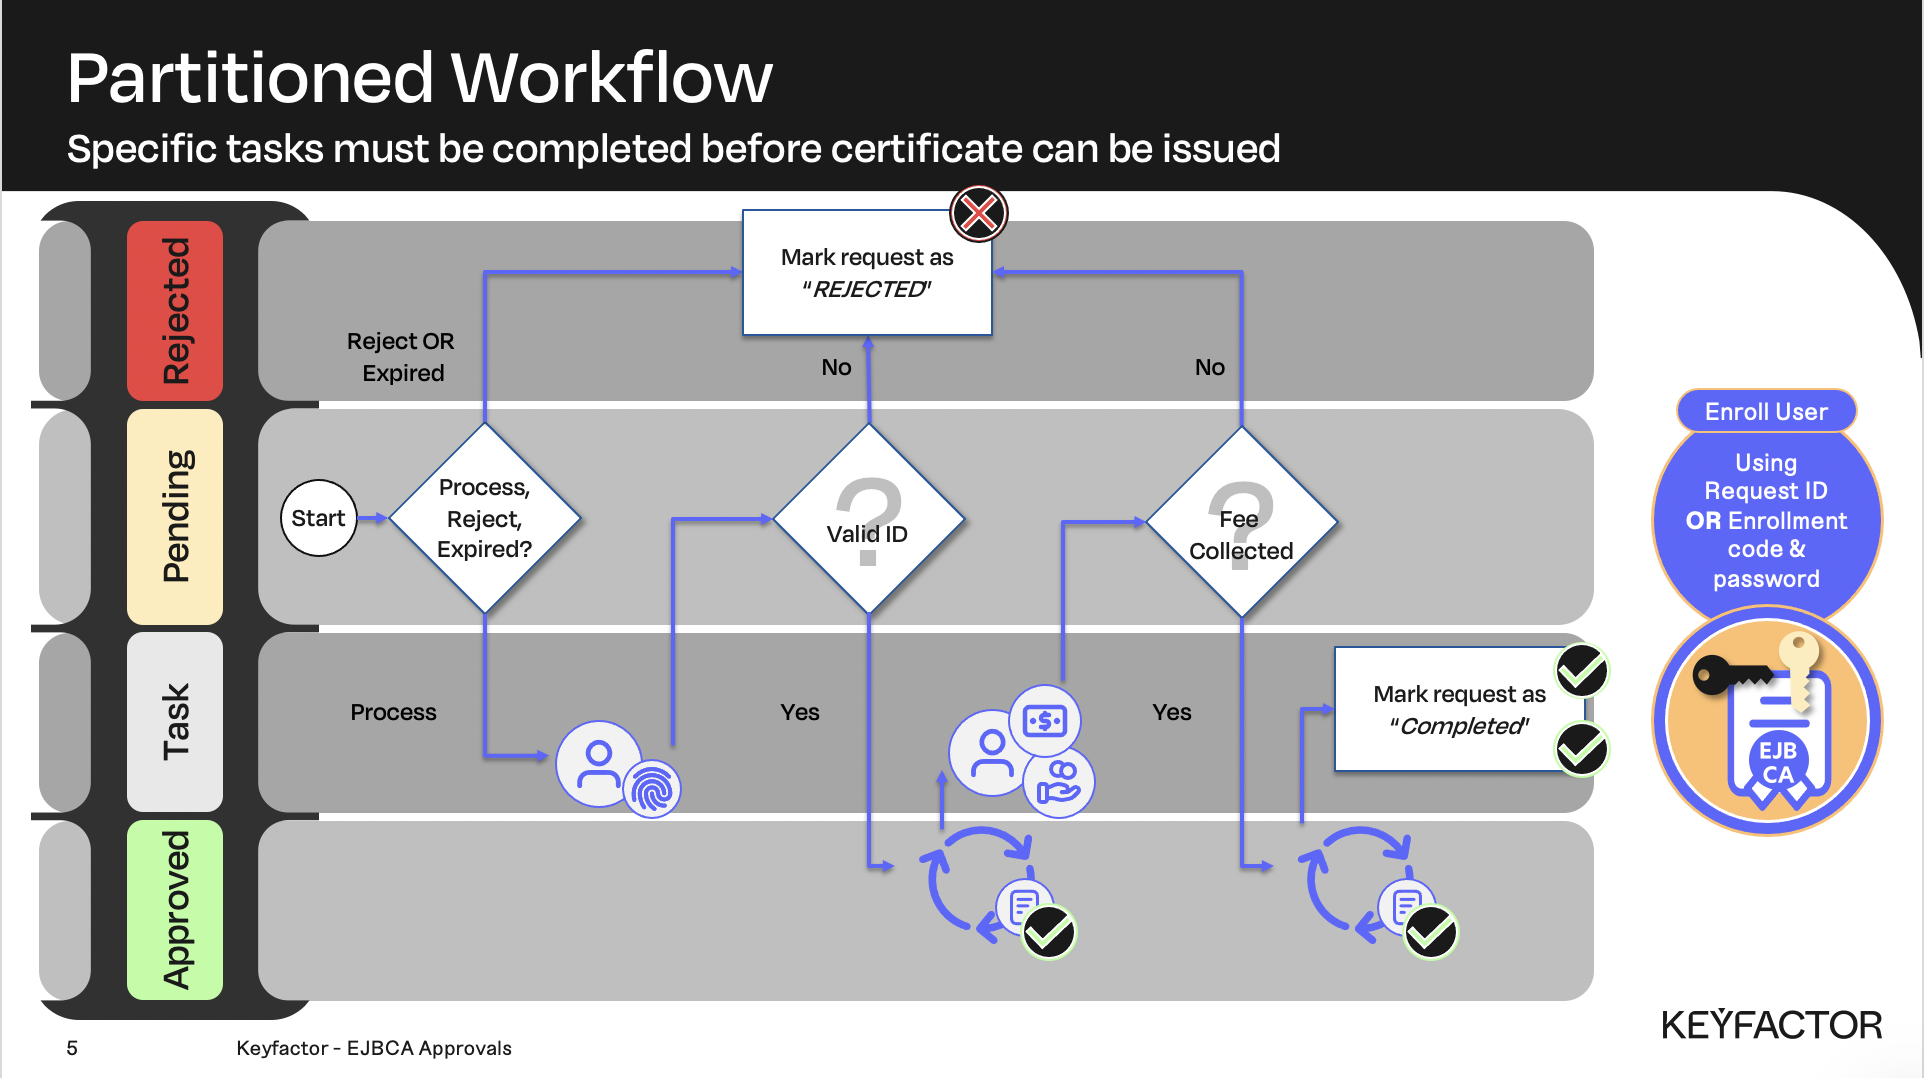
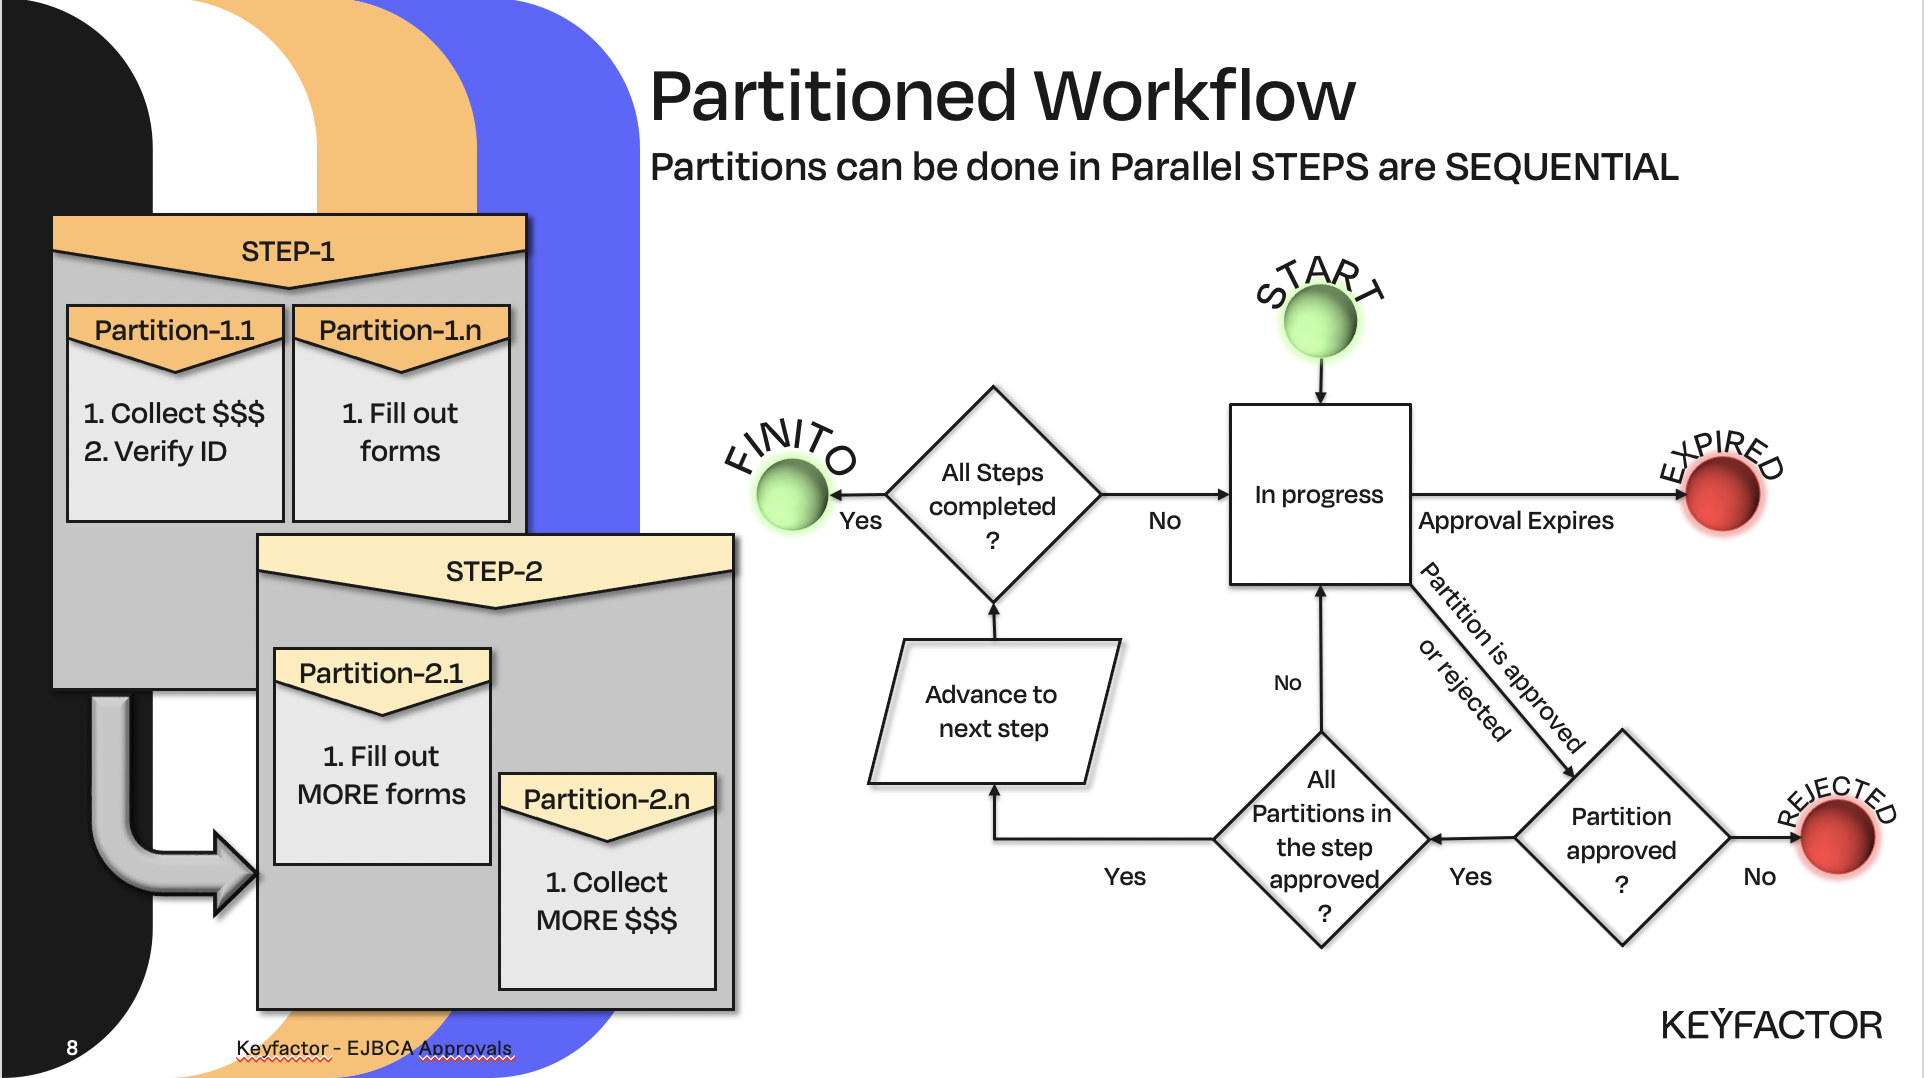
Each partitioned approval consists of one or more steps. Each step contains one or more partitions which can be approved in any order, and each partition contains zero or more UI controls where the administrator can enter data before approving. The following rules apply:
A request is approved if all steps are approved. When a step is approved, the approval process advances to the next step
A step is approved if all partitions in the step are approved
A partition is approved when an administrator with approval rights approves it. When an administrator approves a partition, the partition becomes read-only and the same administrator is not allowed to approve any other partition in approval request. If a partition is rejected, the whole request is immediately rejected.
In this lab, you will create a Partitioned workflow, and obtain "sign off" for each step from various administrators. We will set up approvals for an issuer of national ID cards using the three roles we created in the previous module. This is achieved using a partitioned approval profile with two steps. In the first step, the citizen registers their personal information on a kiosk and walks over to an RA administrator responsible for checking the relevant identification document. The information is cross-checked by a CA administrator. Once the first step is approved, an order is sent out to the card manufacturer. In the second step, the citizen pays and the certificate is loaded on the card.
At the end of the lab you may optionally create the certificate with the approval request ID, or enrollment code and passcode.
Overview
To simulate this process, we are going to perform the following steps in EJBCA:
Create a partitioned approval profile with three partitions and two steps
Configure the approval profile to be used when issuing a new certificate
Edit some access rules to ensure the administrators can approve requests
Request a certificate
Approve the partitioned request
Look at the approved request
Slide Reference
Partitioned workflow allows data to be entered and captured during the approval process
Partitioned workflow process

Approval workflow steps
All workflows are placed on the queue for approval
Partitioned Approval Workflow Steps
Reminder you can visit the Accessing Your Environment page for details on how to connect to your Admin web portal
Create a partitioned approval profile
Open a browser and access the Admin Web Portal. Ensure you are logged in as the SuperAdmin.
Click on Supervision Functions >> Approval Profiles
Fill in the name ID Card Approval and click Add to create a new approval profile
Click Edit for the new approval profile to edit it
Change Approval Profile Type to Partitioned Approval
For Step 1. >> Partition Name enter Data Entry as the name of the partition
Change Roles which may approve this partition to Training RA Administrator Role
Add a new text field to the partition by selecting Text Field in the drop down list and type Form of identification in the Label text box
Click Add Field
Add a new Check Box to the partition with the label Form signed
Click Add Field
Click on the button called Add Partition to add a new partition
Name the second partition to Data validation
Change Roles which may approve this partition to Training CA Administrator Role
Add a new text field to the partition by selecting Text Field in the drop down list and type Comment in the Label text box
Click Add Field
Click on the button called Add Step to add a new step
Name the second step partition to Receipt
Change Roles which may approve this partition to Super Administrator Role
Add a new text field to the partition by selecting Number (Short) in the drop down list and type Amount paid in the Label text box
Click Add Field
Click Save to save the approval profile
Enable the approval profile
Click on CA Functions >> Certificate Profiles in the left menu
Click Edit for the profile ApprovalCertificateProfile
In the Approval Settings-section, change Add/Edit End Entity to ID Card Approval
Click Save
Edit access rules
Click on System Functions >> Roles and Access Rules in the left menu
For Training RA Administrator Role, click on the link Access rules
In the End Entity Profiles listbox, add ApprovalEndEntityProfile
Click Save
Click on the link in the top right corner called Back to Roles Management
For Training CA Administrator Role, click on the link called Access rules
In the Authorized CAs listbox, select All
Click Save
Request a certificate
Reminder you can visit the Accessing Your Environment page for details on how to connect to your RA web portal
Open a browser and click RA Web, from the ribbon menu across the top of page
Click Enroll >> Make New Request
Choose Certificate Type ApprovalEndEntityProfile
In the Key-pair generation selection, select By the CA
In the CN, Common name field, enter ID Card Request
In the Username field, enter ID Card Request
In the Enrollment code field, enter foo123
In the Confirm enrollment code field, enter foo123
Click on the button Confirm Request
Close the browser
Approve the request
To log in as different administrators open a NEW PRIVATE Window in Firefox, or the browser you are working with. A private window allows you to login as a different user from the main browser window. To login using a PRIVATE window in Firefox, select New Private window from the “Burger menu” - upper right corner in Firefox. See the “Accessing your Environment” page for more details on launching a PRIVATE window and logging into RA Web.
Open a browser and click RA Web, from the ribbon menu across the top of page.
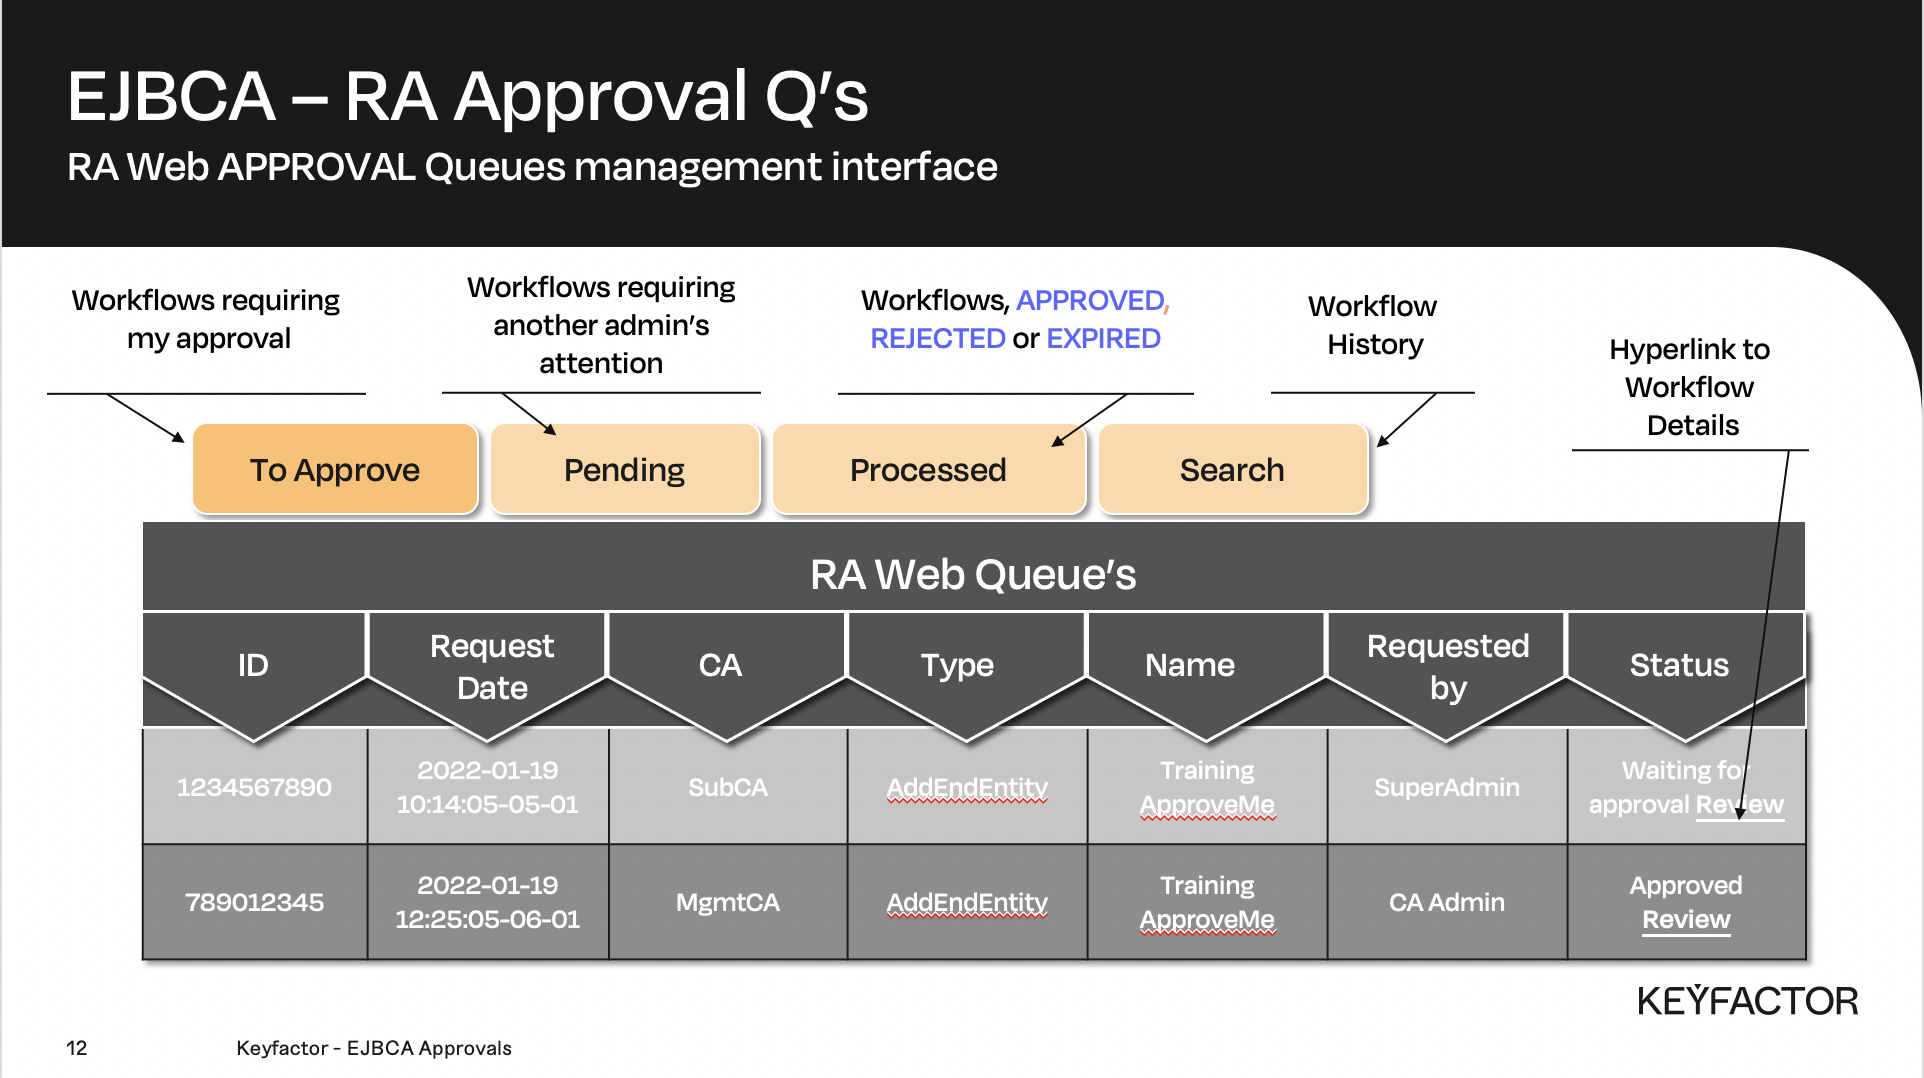
Ensure you are logging in using the training_RAAdmin certificate.Click on Manage Requests in the menu
Click on the tab To Approve
Click on the Review link for the request with the name ID Card Request
In the text field Form of identification type in Passport
Tick the checkbox Form signed
Click Approve to approve the first partition in the first step
Close the PRIVATE window
To log in as different administrators open a NEW PRIVATE Window in Firefox, or the browser you are working with. A private window allows you to login as a different user from the main browser window. To login using a PRIVATE window in Firefox, select New Private window from the “Burger menu” - upper right corner in Firefox. See the “Accessing your Environment” page for more details on launching a PRIVATE window and logging into RA Web.
Open a browser and click RA Web, from the ribbon menu across the top of page.
Ensure you are logging in using the training_CAAdmin certificate.Click on Manage Requests in the menu
Click on the tab To Approve
Click on the Review link for the request with the name ID Card Request
In the text field Comment type OK
Click Approve to approve the second partition in the first step
Close the PRIVATE window
To log in as different administrators open a NEW PRIVATE Window in Firefox, or the browser you are working with. A private window allows you to login as a different user from the main browser window. To login using a PRIVATE window in Firefox, select New Private window from the “Burger menu” - upper right corner in Firefox. See the “Accessing your Environment” page for more details on launching a PRIVATE window and logging into RA Web.
Open a browser and click RA Web, from the ribbon menu across the top of page.
Ensure you are logging in using the training_SuperAdmin certificate.Click on Manage Requests in the menu
Click on the tab To Approve
Click on the Review link for the request with the name ID Card Request
In the number field Amount paid, type 25
Click Approve to approve the second step
Close your browser
View the approved request
To log in as different administrators open a NEW PRIVATE Window in Firefox, or the browser you are working with. A private window allows you to login as a different user from the main browser window. To login using a PRIVATE window in Firefox, select New Private window from the “Burger menu” - upper right corner in Firefox. See the “Accessing your Environment” page for more details on launching a PRIVATE window and logging into RA Web.
Open a browser and click RA Web, from the ribbon menu across the top of page.
Ensure you are logging in using the SuperAdmin certificate.Click on Manage Requests in the menu
Click on the tab Processed
Click on the Review link for the request with the name ID Card Request. Here you can see the data which was entered during the approval process.
? Question and Answers ?